
The Jeep isn’t done but enough of the Jeep works to make it drivable!
Checking the Temperature Sensor and Gauge
After getting all the electrical working on the Jeep, I noticed that the only gauge not working was the temperature gauge. The gauge would always keep in the “Cold” region no matter how hot the engine or sensor got.
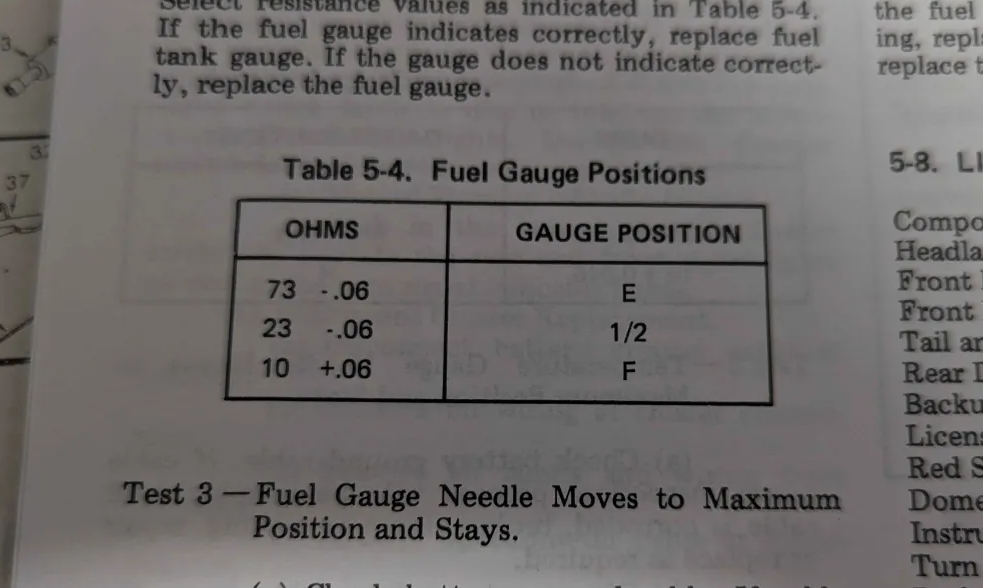
The factory service manual says the resistance values are for the gauge and sensor are:
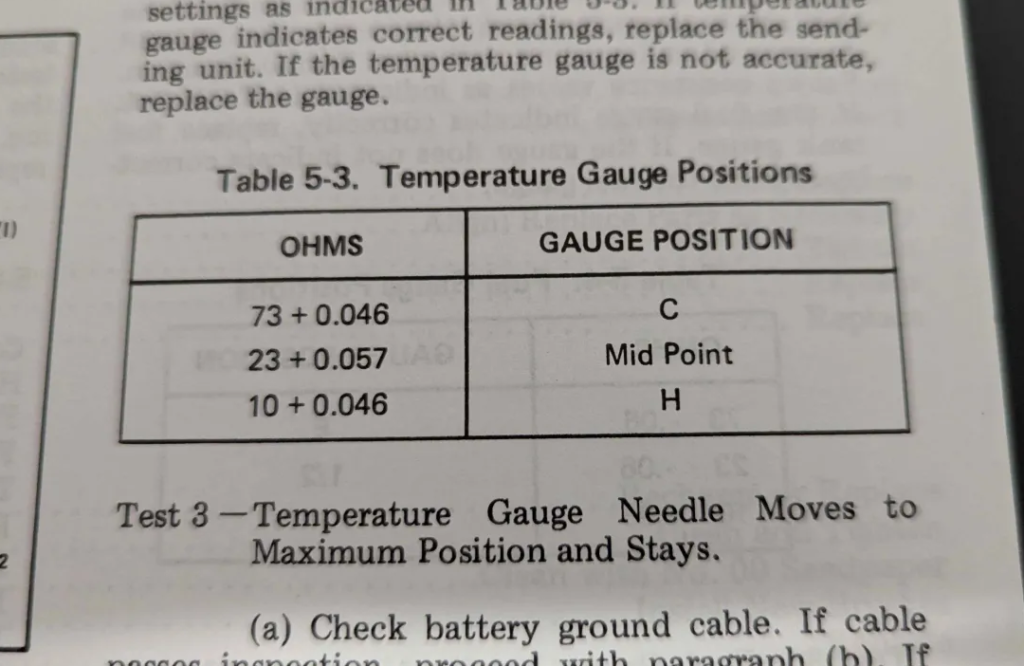
Cold engine is supposed to be around 73 ohms off the sensor, 23 ohms for operating temp, and 10 ohms for hot.
I taped a thermocouple to the sensor body and measured the resistance of the thermistor sensor.
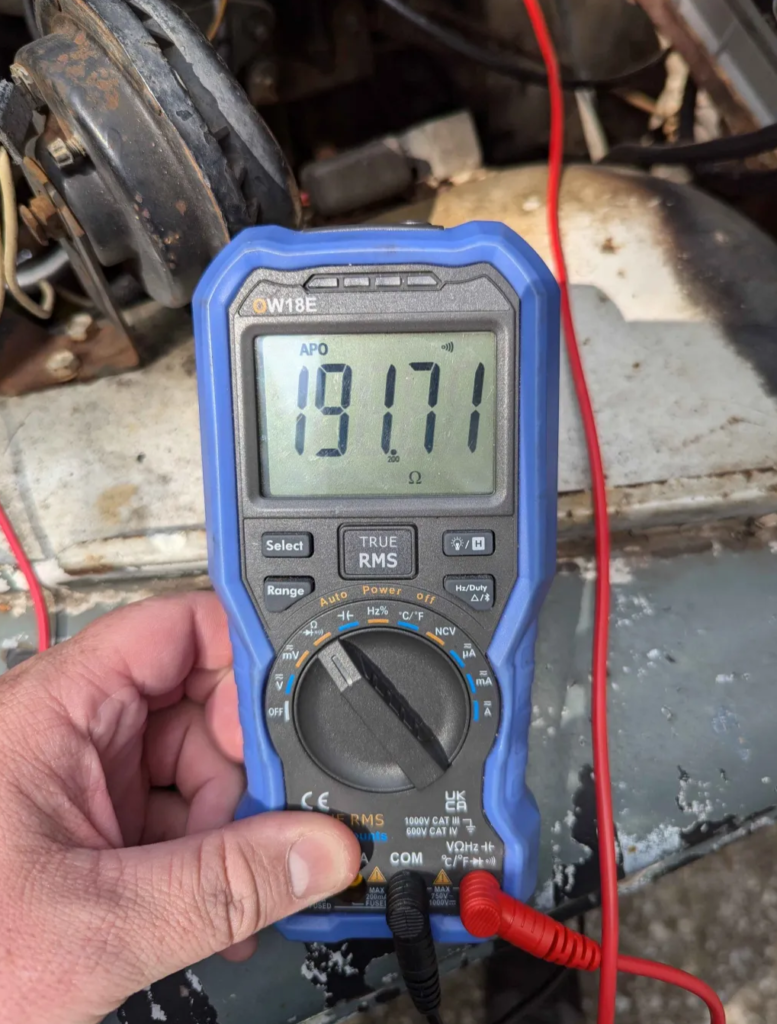
At ~87F the sensor is measuring ~192 ohms. That is way to high! But lets heat up the engine and see what we get.
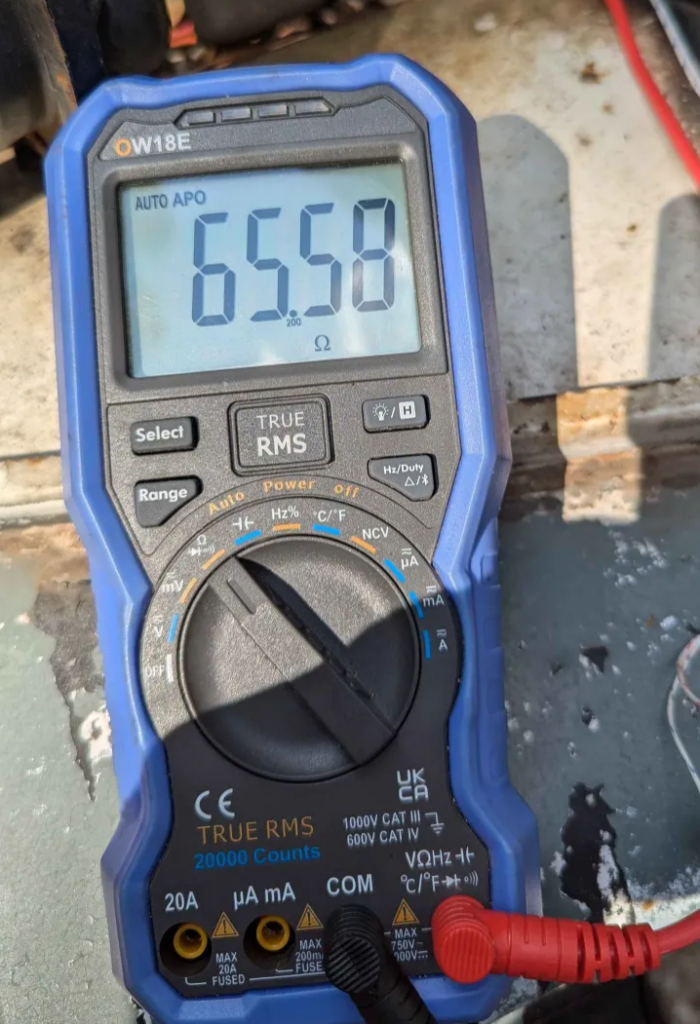
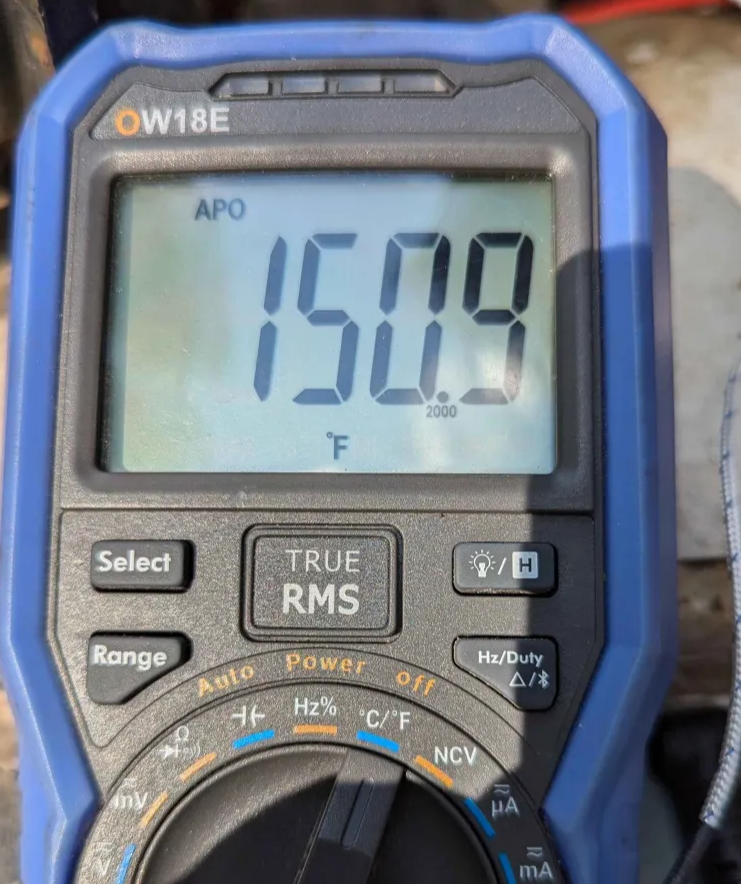
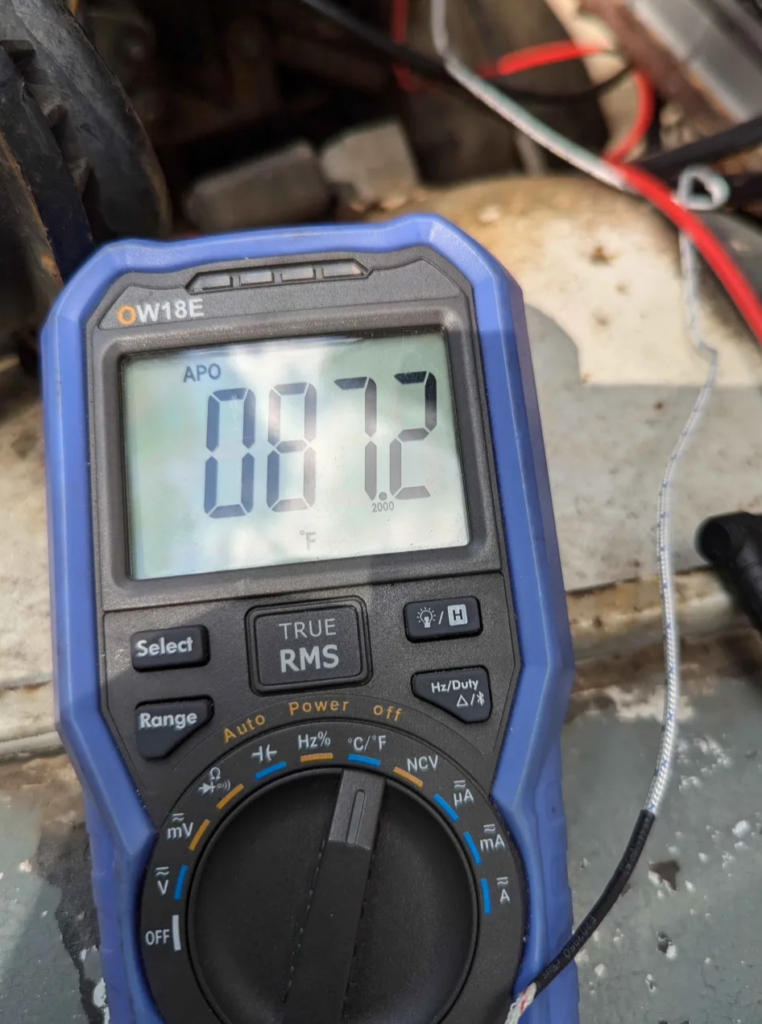
With the engine heated up to 151F the sensor is reading 66ohms. This is barely off the “Cold” mark the service manual says.
To test the gauge. I got a 22 ohm resistor and a 10 ohm resistor and “simulated” the sensor with them. These resistors moved the gauge to the appropriate spots! So the gauge is working correctly.
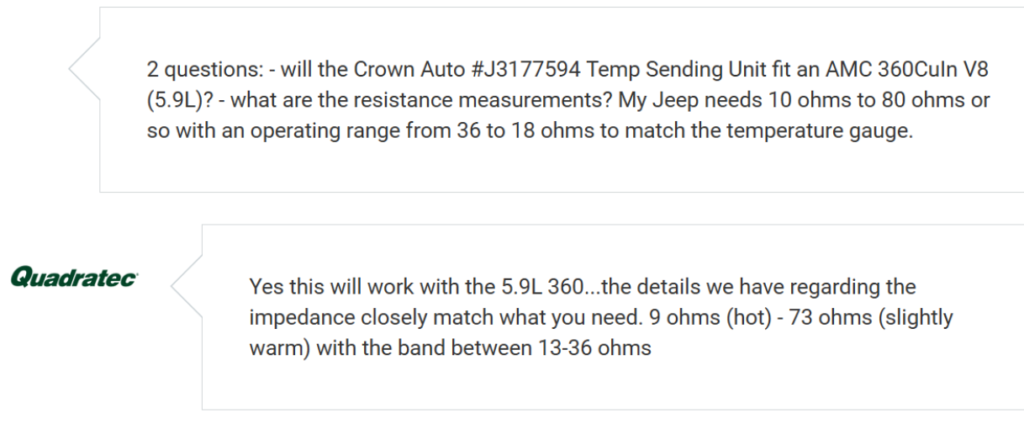
Finding a sender/sensor that works for this seems to be tough. Jeep used a couple different sensors and gauge combos over the years. According to Quadratec customer service, Crown’s J3177594 has the correct range.
I got this part on order and lets see if it works!
Digital Input Simulation
Nominal automotive voltages range widely. Your circuit needs to handle anywhere from 10V to 15V to properly function correctly. This is a challenge on the power supply side but it is forgotten often on the input/output control side of the circuits.
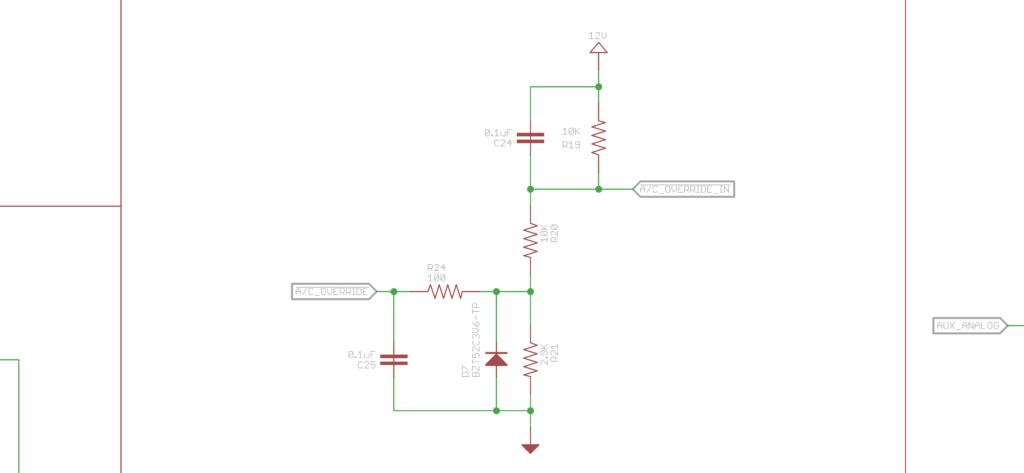
Below is my current digital input circuit for the Cyclone Pulse Wrangler. This is an active low circuit. A switch pulls AUX_DIGITAL_IN to ground. This goes through some filtering and a voltage divider so the 3.3V MCU can safely determine if the switch is activated or not.
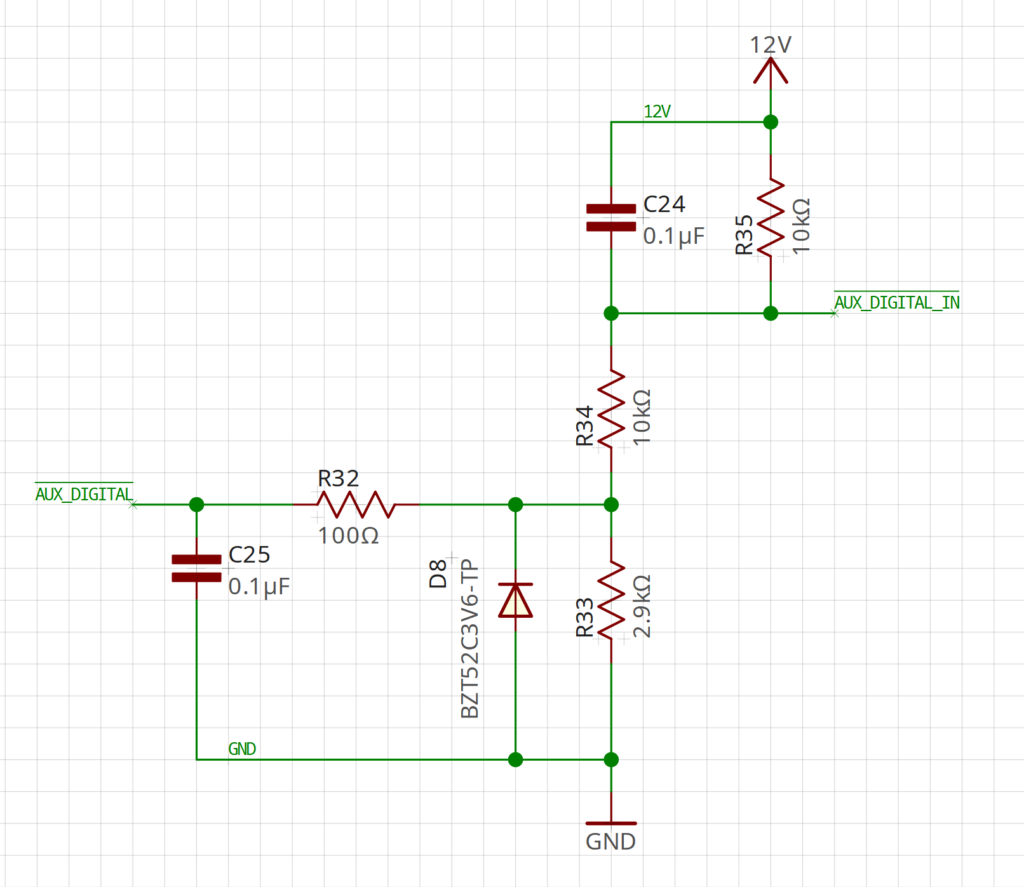
On the MCU side (SAM D21 in this case), there is a threshold on the GPIO input on where the MCU considers the difference between a high or low signal. We need to make sure over the range of the power supply voltage (10V to 15V) that the MCU considers it to be a high signal.

This in page 875 of the family datasheet. VDD is 3.3V in our circuit. VIL and VIH is what is important here. VIL is 0.99V and VIH is 1.815V. This means if the voltage on the GPIO pin is high and drops below 0.99V then the MCU will register that as a low. If the signal is low and rises above 1.815V then it will consider it a high. Between these voltages it doesn’t initiate a state change.
We need to check to see our circuit stays above 1.815V output across the entire span. LTSpice is a goodish program to do this
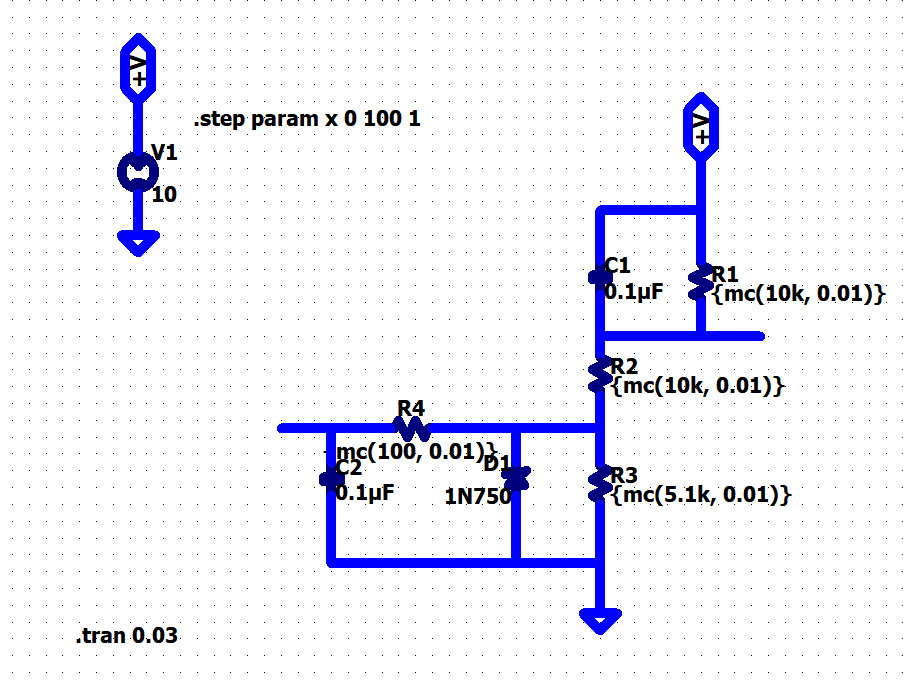
Above is the circuit in LTSpice. Stepping the +V from 10V to 15V gives the following output.
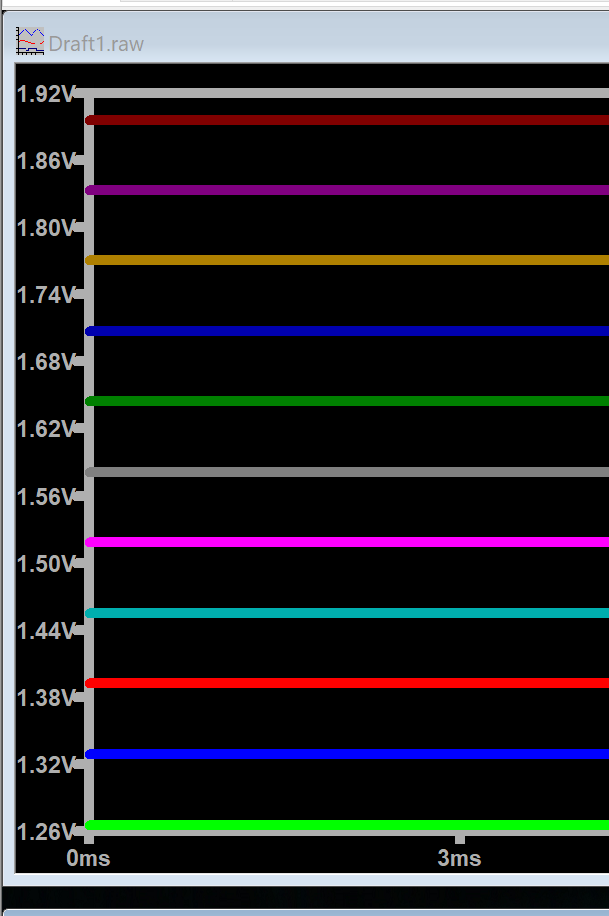
Well that isnt good! At 15V we get ~1.9V but at 10V we get ~1.26V which is in our gray zone! Lets change the 2.9K to 5.1K (R33) and see what we get.
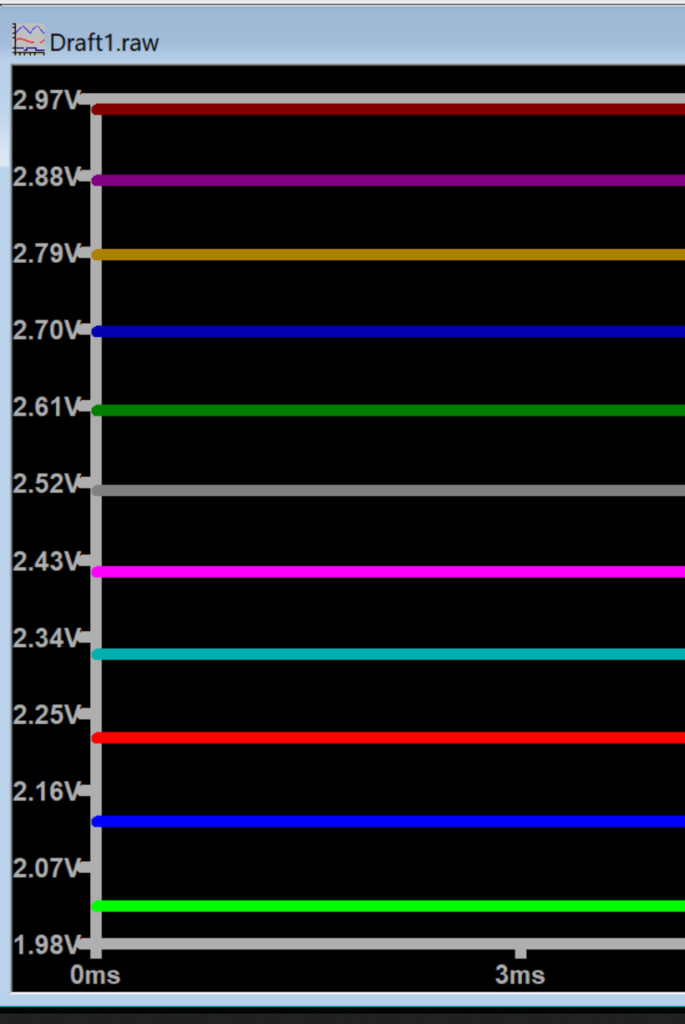
OK! Everything is in our deterministic range for a high signal! But lets check for resistor tolerances. Running a monte carlo simulation with 1% resistors gives us the following outputs. 10V rail and then 15V rail.
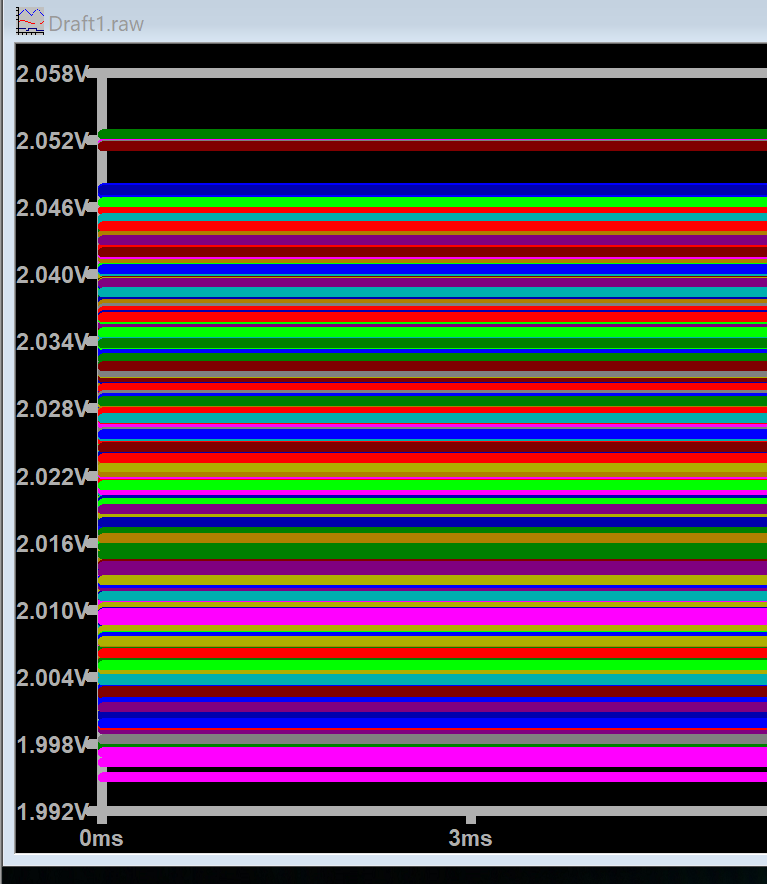
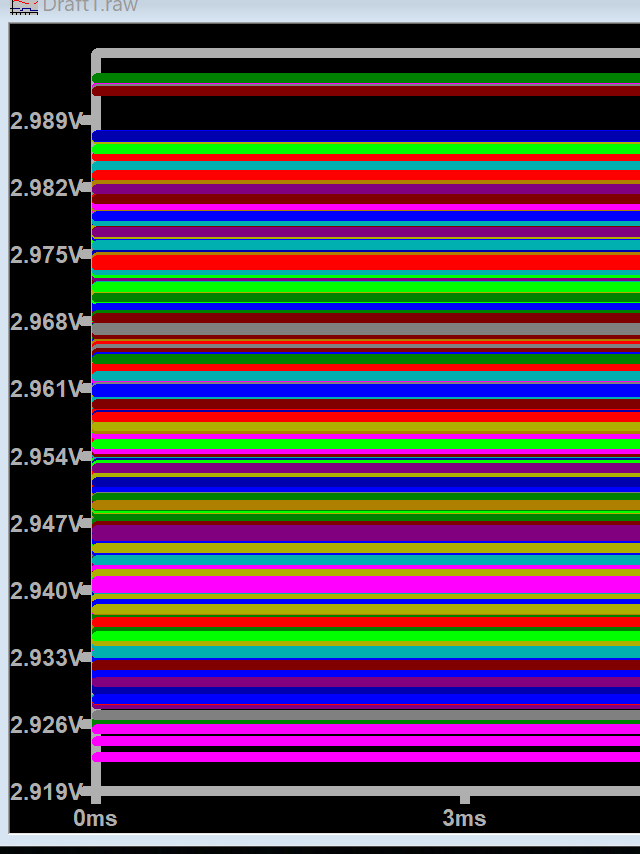
Well that looks good as well. Digital input should operate fine on the Cyclone Pulse Wrangler!
Thermistor Readings
Automotive temperature sensors are typically thermistors. Resistance changes as the temperature changes. Most of the time you don’t want this to happen in normal resistors but thermistors are designed to change in a predictable manner so they can be used as sensors.
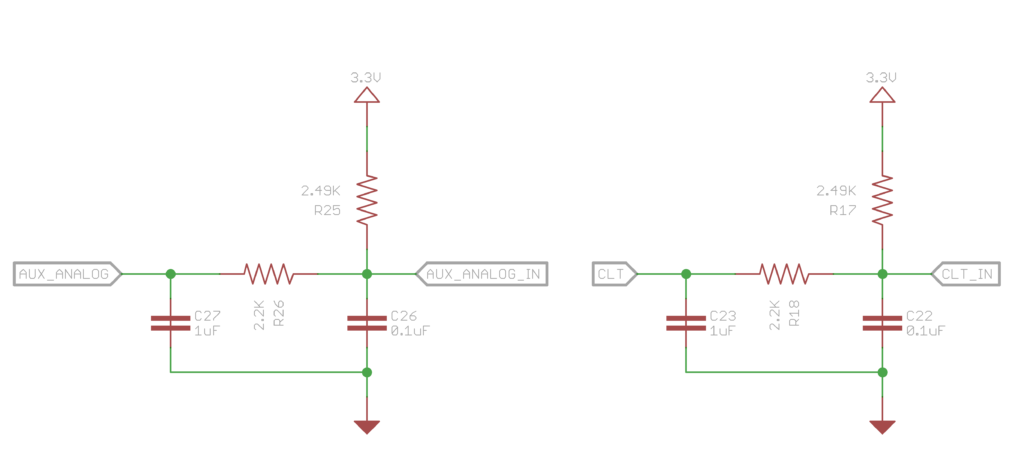
There are multiple ways to read the resistance of a thermistor but the easiest way is to make it part of a resistor voltage divider and use an ADC to convert the mid point to the temperature.
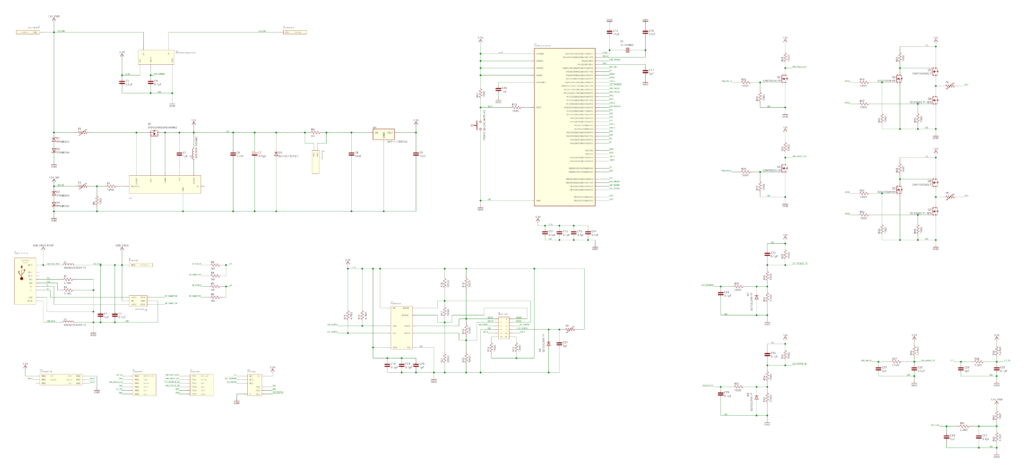
This is the circuit I designed for the Cyclone Pulse Wrangler.

This is lifted from a variety of open source engine control hardware circuits.
I don’t know who or where the original 2.49K ohm pull up is from but most aftermarket sensors reference that pull up as well. I like AEM sensors and use the 30-2013 sensor in a lot of projects. They include easy to find calibration charts.
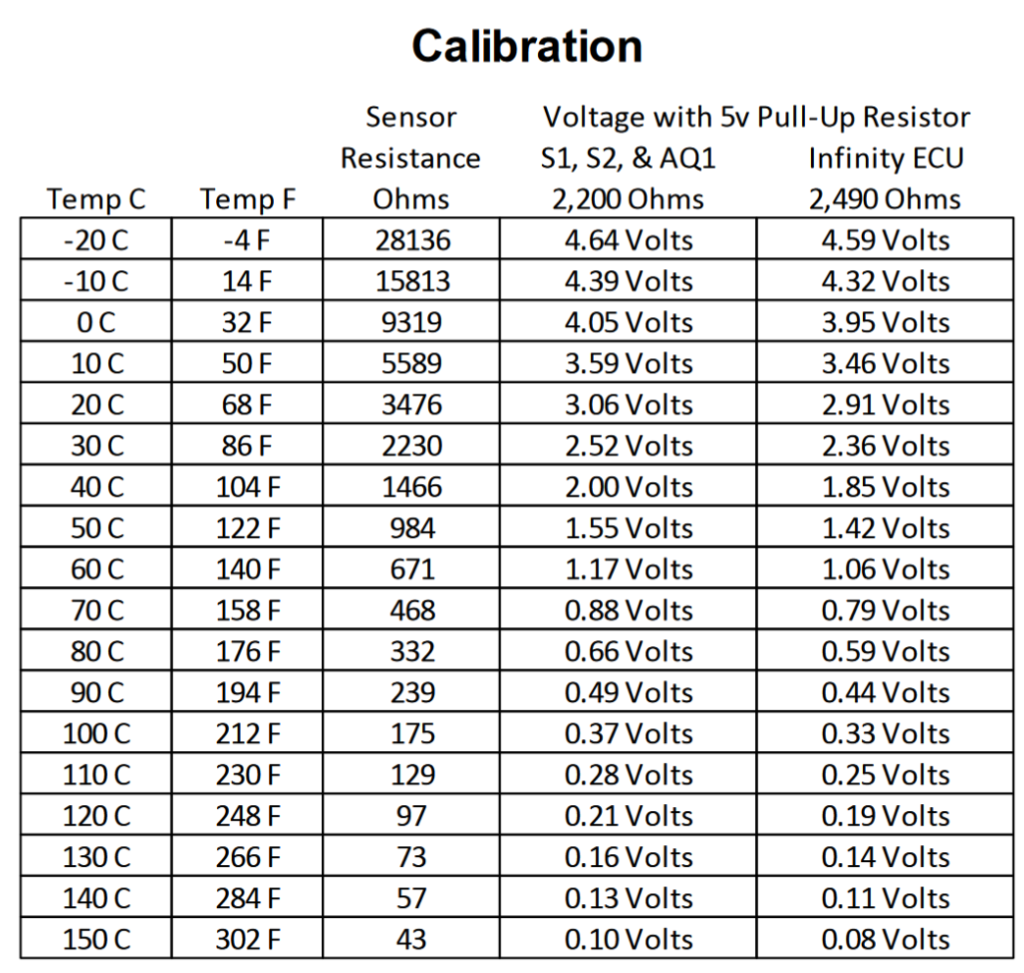
Now this is great if you are using a 5.0V sensor rail but the Cyclone Pulse Wrangler only has a 3.3V rail so some conversion is needed. I used chatGPT to convert the chart in the datasheet for the sensor into a CSV file I could import into a google doc.
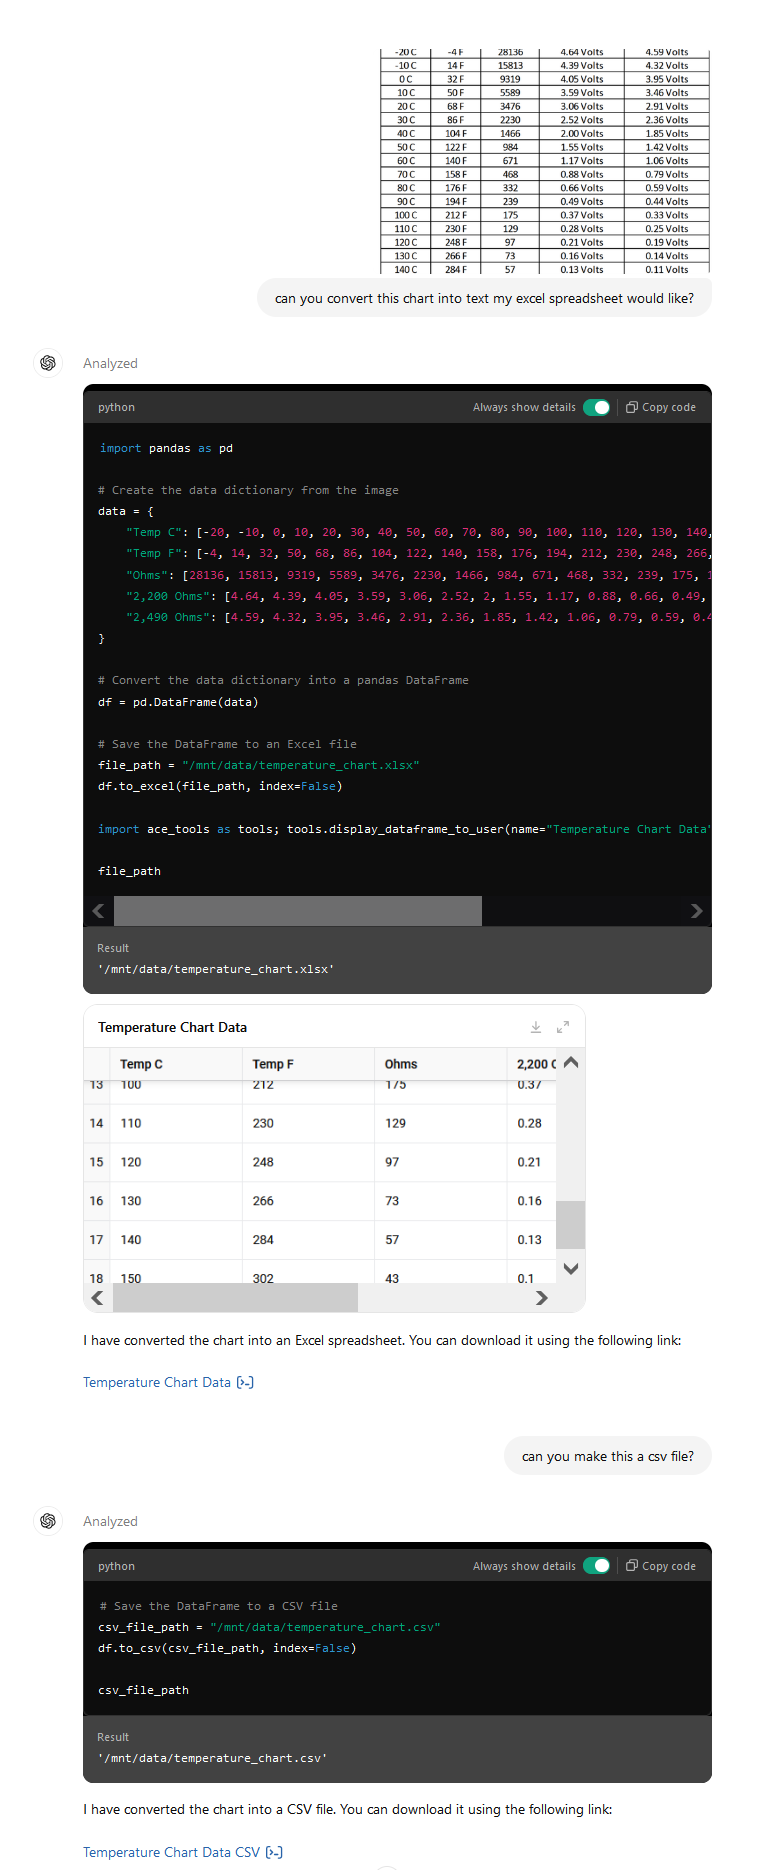
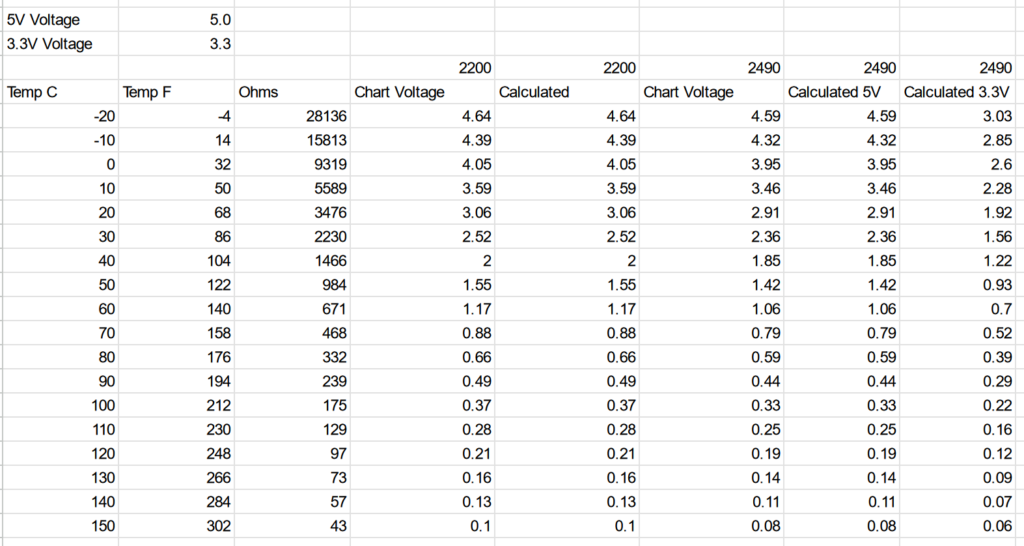
Then just used some ohms law magic to make the below chart. Here is a link to the google doc if you want to see the formulas and copy it for other sensors.
There are some downsides to this method. Since you are passing current through the thermistor there is some self heating involved which will of course change the resistance of the thermistor… and then change the current… and then change the resist…. yeah you see where this is going. Here is a good paper on measurement error in thermistors due to self heating by Ti.
A way around that is to control the voltage supply that goes into the voltage divider and only turn it on when you need a reading. Chips like the MAX6682 do this automatically. A high side fet could be incorporated into the design.
Is this a big problem in automotive applications? Engines run around the 100C mark so lets use that resistance from the chart above (175 ohms).
With the 2.49K resistor on the top side of the divider we get a voltage of 0.217V across our thermistor. That is ~0.00124A of current across it. We are talking 0.00026908 watts. Compared to the engine coolant. This is nothing.
Another source of error is current through the ADC. You want a high impedance here to prevent leakage current changing the reading. Most modern ADCs in MCUs are going to be high enough to prevent this being an issue in an automotive setting but it is always good to check if you are using a high end ADC that has low input impedance. An instrumentational opamp might be needed.
Converting to LibrePCB
With Eagle being having a sunset date from Autodesk and not wanting to use Autodesk Electronics (Eagle in Fusion). I looked for EDA tool alternatives. I spent a good portion of the beginning of 2024 learning and building a product in KiCad v8. See the launch video below.
After fighting KiCad for months, I gave up and will be trying out LibrePCB.
I have converted my Cyclone Pulse Wrangler circuit to LibrePCB. So far I am very happy with the tool. It needs a few QOL improvements but, overall, much more enjoyable experience then KiCad. I am not constantly looking up how to do simple actions.
LibrePCB has a REALLY good Eagle Part Library importer. One of the best I have ever used.
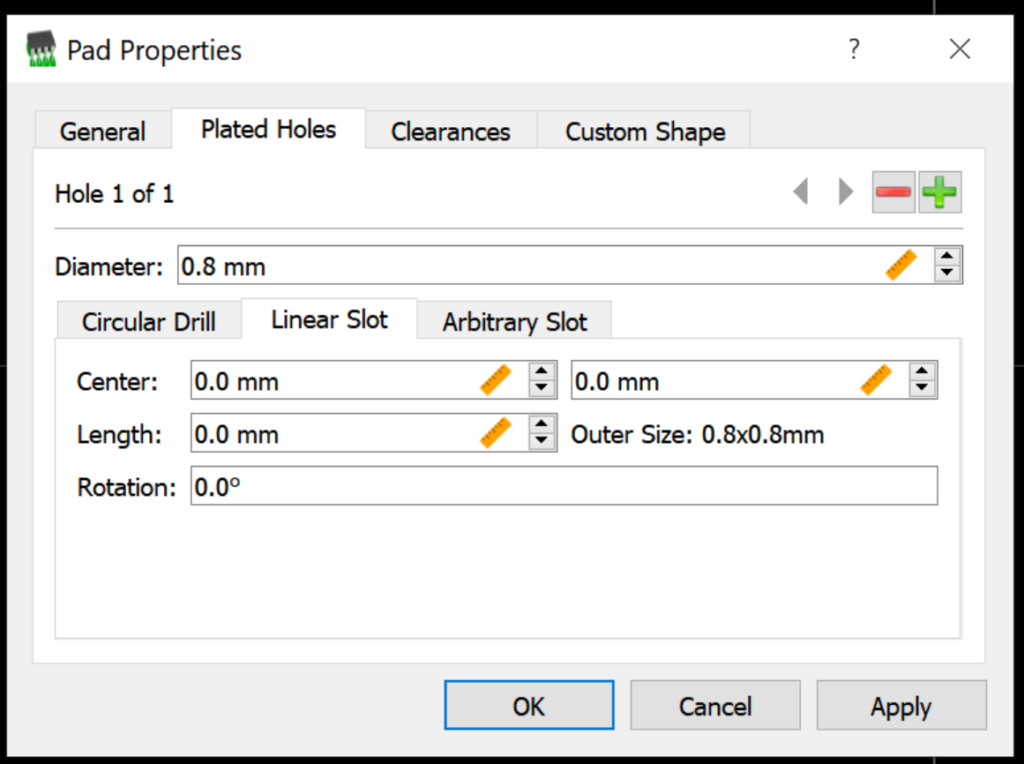
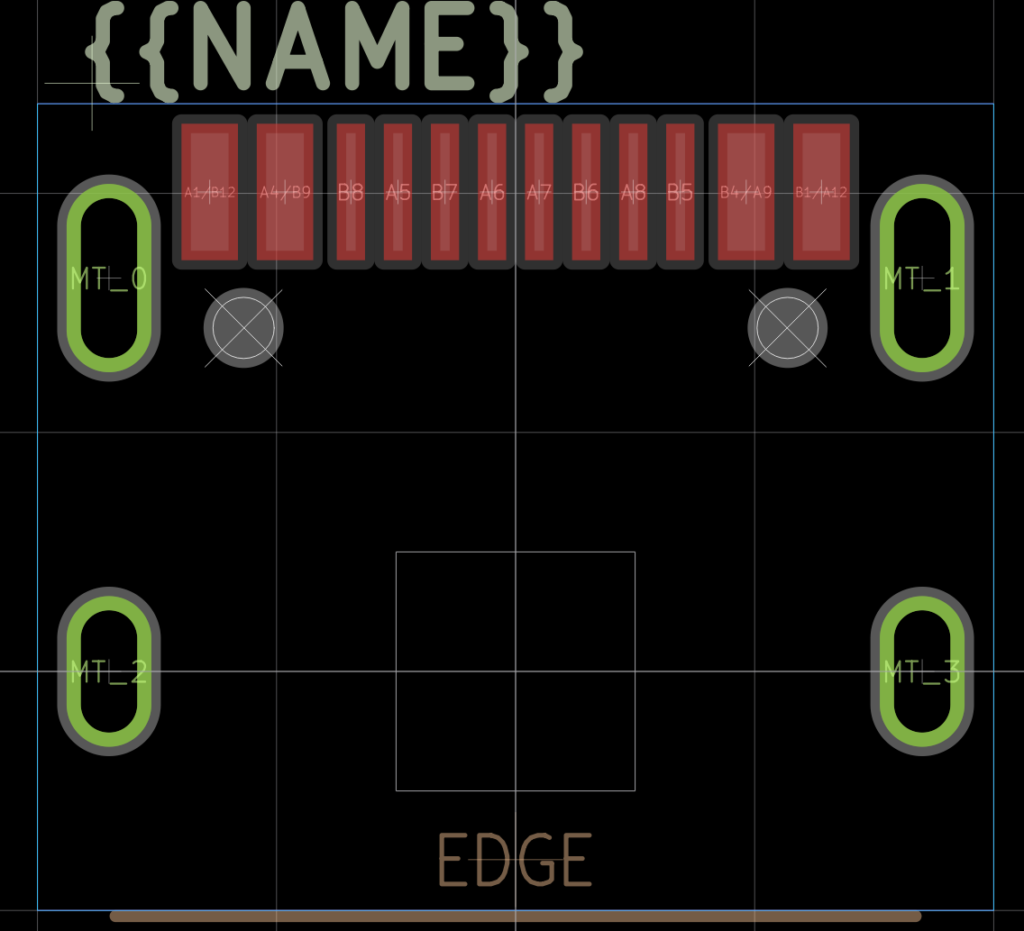
The tool also supports plated slots in the footprint editor natively. No “workarounds” that are required in Eagle and KiCad to pull them off.
I have only used the library and schematic editor. Both are missing more complex tools that Eagle and KiCad have but for 99% of PCB designers and users. They will never use those… and I rarely use them as well.
Let us see how the PCB layout tool is!
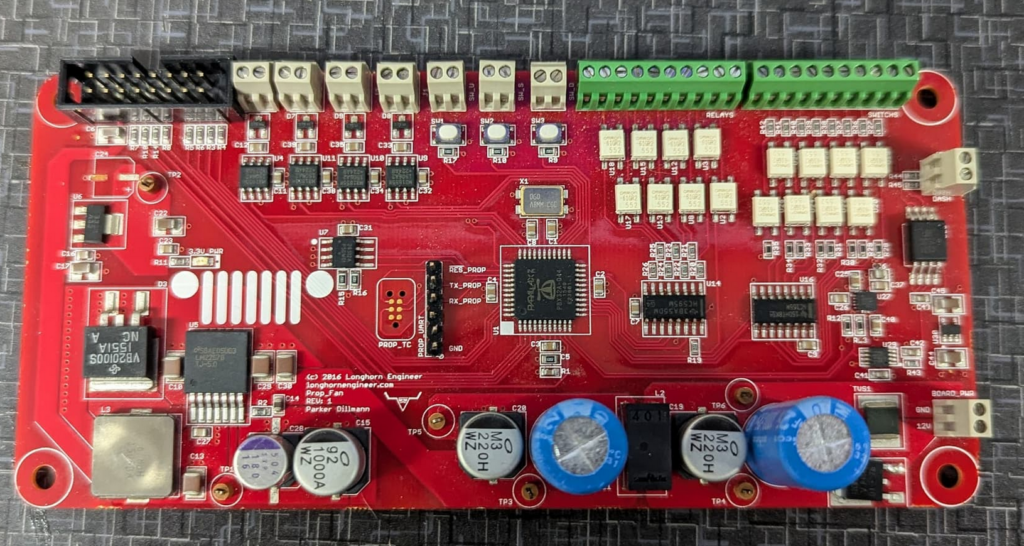
The Cyclone Pulse Wrangler
This is the evolution of the “jeep prop fan” controller I built what feels like a life time ago.
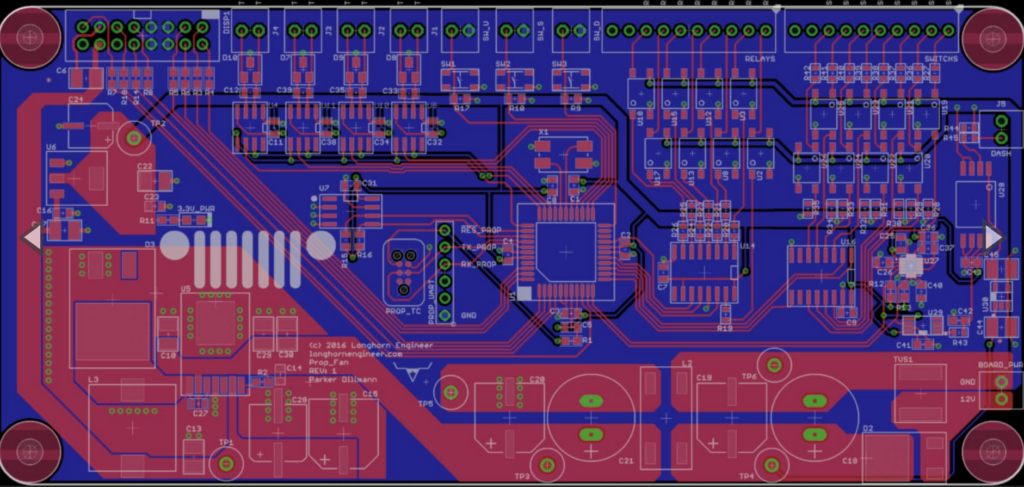
I did build this board as well back in 2016 but never finished the code or used it in the Jeep.
Here is the github repo of what I have so far. I did a complete redesign and rescope of the project. The original was more of a Power Control Module. Gonna try to stick to just a PWM fan controller this time around.
https://github.com/LonghornEngineer/Cyclone-Pulse-Wrangler
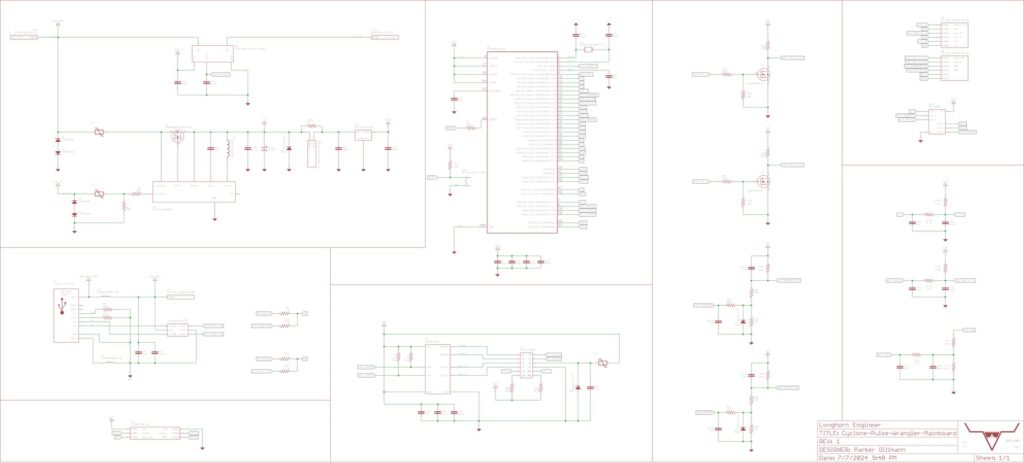
Biggest change was moving to a SAMD21 mcu. Have lots of these left over from my pinball controller days.
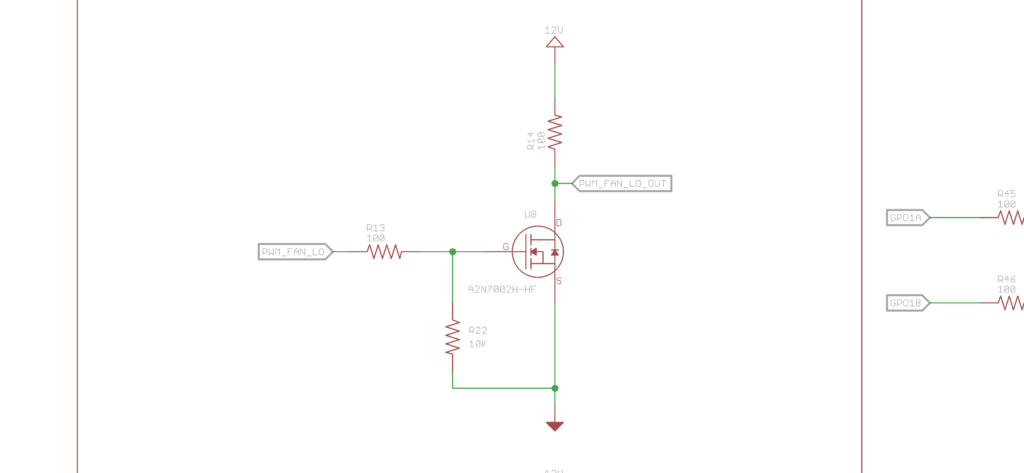
This is the PWM output circuit. Pulling the signal to 12V though a 100ohm 1/4W resistor. A2N7002H-HF n-channel fet pulls it down.
Here is the digital inputs to the system. These are active low inputs. 12V is the high. I am using a voltage divider to knock down what is the max voltage of ~14.7V to ~3.3V. I am not 100% sold on this circuit yet and might go with an optocoupler if convinced with the right part number. A 3.6V Zener Diode (BZT52C3V6-TP) helps make sure that I/O pin doesn’t get too out of wack.
To read the temperature sensors, which are thermistors, I just lifted the circuit that other engine control uses. Low pass filter and a pullup. I/O pins are protected with a SP721ABG SCR/Diode chip.
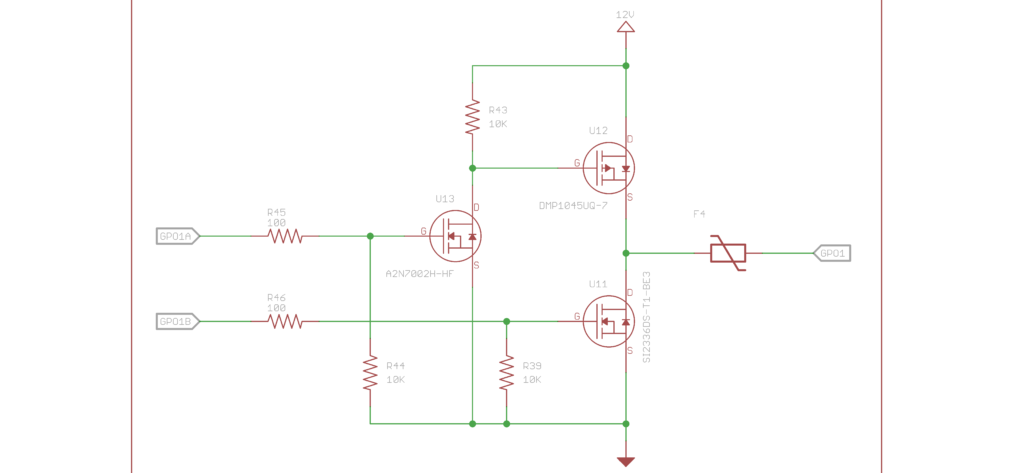
The last part to highlight so far is the driver outputs. These can be used to drive relays or indicator lights or whatever. These can be a voltage source or a ground sink depending on what is needed. Basically a half bridge setup. Don’t set both I/O pins high ![]() Maybe I add in some gate logic to prevent shoot through condition? Or just write the code with a check before setting the outputs?
Maybe I add in some gate logic to prevent shoot through condition? Or just write the code with a check before setting the outputs?
Keychain – MAILBOX
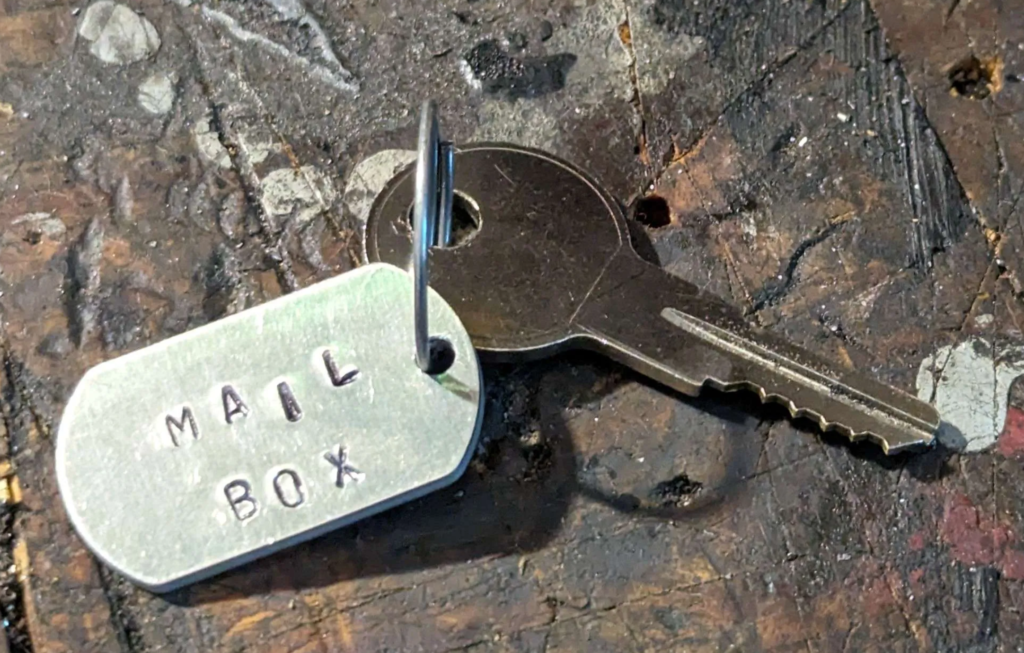
Keeping with the theme of the DJ Mail Jeep, I made a keychain by hand stamping a metal tag and then dry brushing the lettering.
Oh and the DJ has a nick name now. Mail Box!
New Tires and Wheels
The Jeep needed new tires bad. The ones it came with where dry rotted, leaked, and even one exploded on the previous owner with it just sitting in there driveway!
What to get? Well I want to keep the look of the Jeep as stockish as I can for the wheels and tires. These Jeeps had really thin tires and wheels.
Here is what the factory service manual said the Jeep came with. Tire size is E78 x 15 and Wheels are a 15″ 5.5″ K.
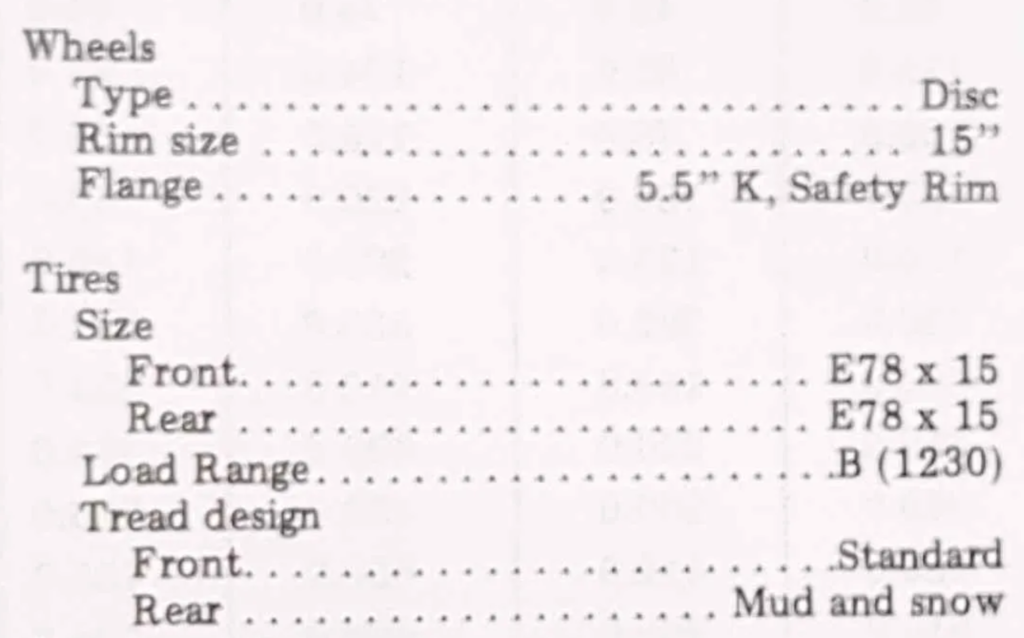
Well these are not modern sizes at all! But this makes sense. These jeeps came with bias ply tires with tubes.
Lets try to find new wheels first. The bolt pattern on these Jeeps are 5.5″ x 5 pattern with a 4.25″ center bore. Common CJ Jeep pattern so that is good. Width is 5.5″ and 15″ diameter. The wheels the Jeep came with fit the Jeep but are actually 6″ wide. I know its only 0.5″ but i want to keep it skinny wheeled. I also don’t know what “K type” is as well? I have found some links on some old forums about the different type of wheels Jeep had but the link was dead.
I found this seller on Ebay that has original reproduction wheels for CJs that are 5.5″ wide and are for tubeless tires. Perfect!
Now on to the tires. E78 x 15 is an old school bias ply tire size.
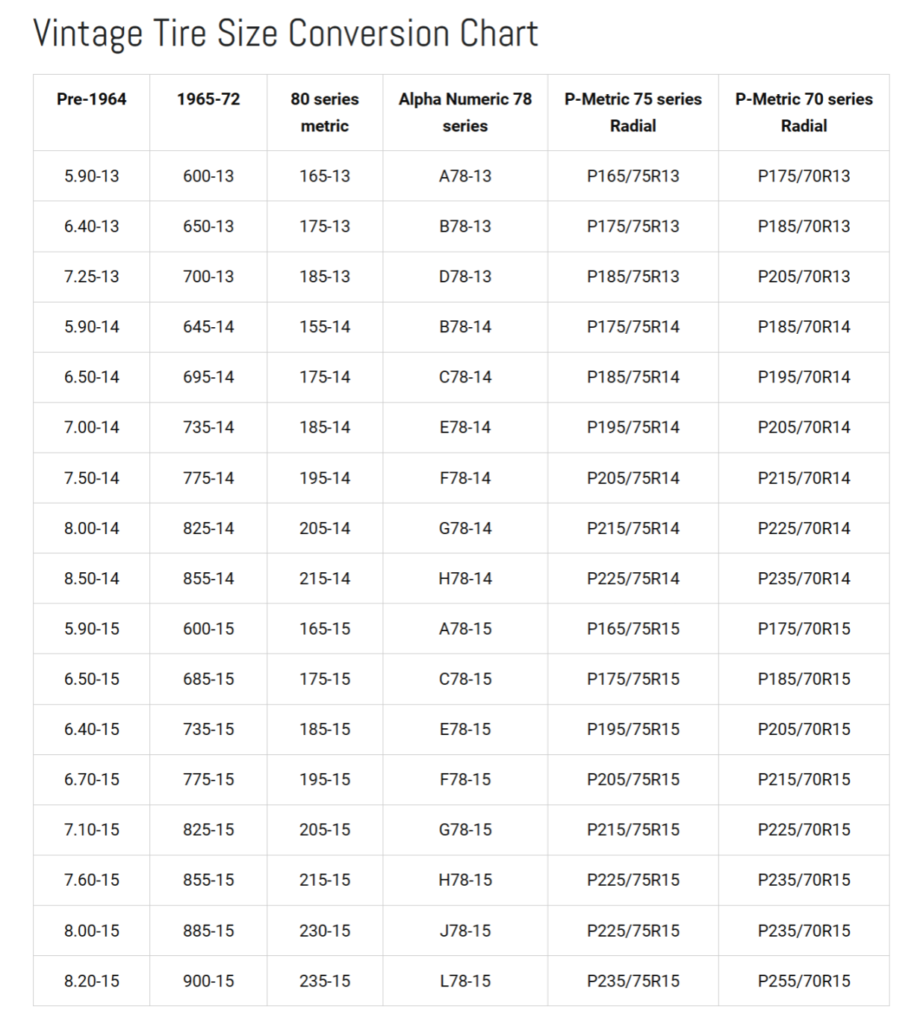
This chart says the tire should be around a 6.4″ wide tire. Modern size says P205/70R15.
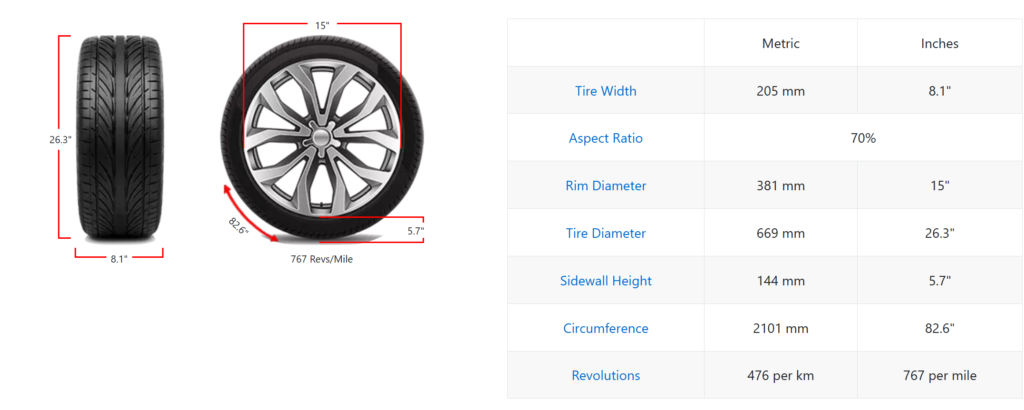
The modern tire is ~27″ diameter and ~8″ wide. That is way to wide! No wonder the turn stops on this jeep where jacked way out. The wider modern tires where rubbing at full steering lock.
I looked at some CJ-5 forums for tire sizes and found that 7.00-15 bias ply tires fit well and look the part. I found a set of Power King Extra Traction – Lt7.00x-15 on ebay.
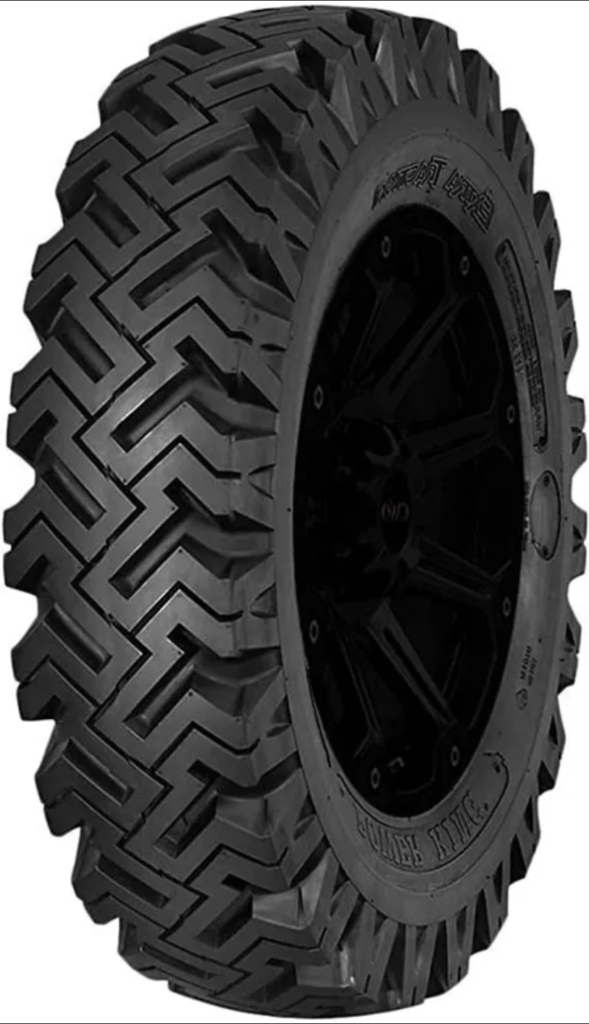
These tires are a bit taller then the stock ones that came on the DJ Jeep but atleast they are near the same width and look the part.
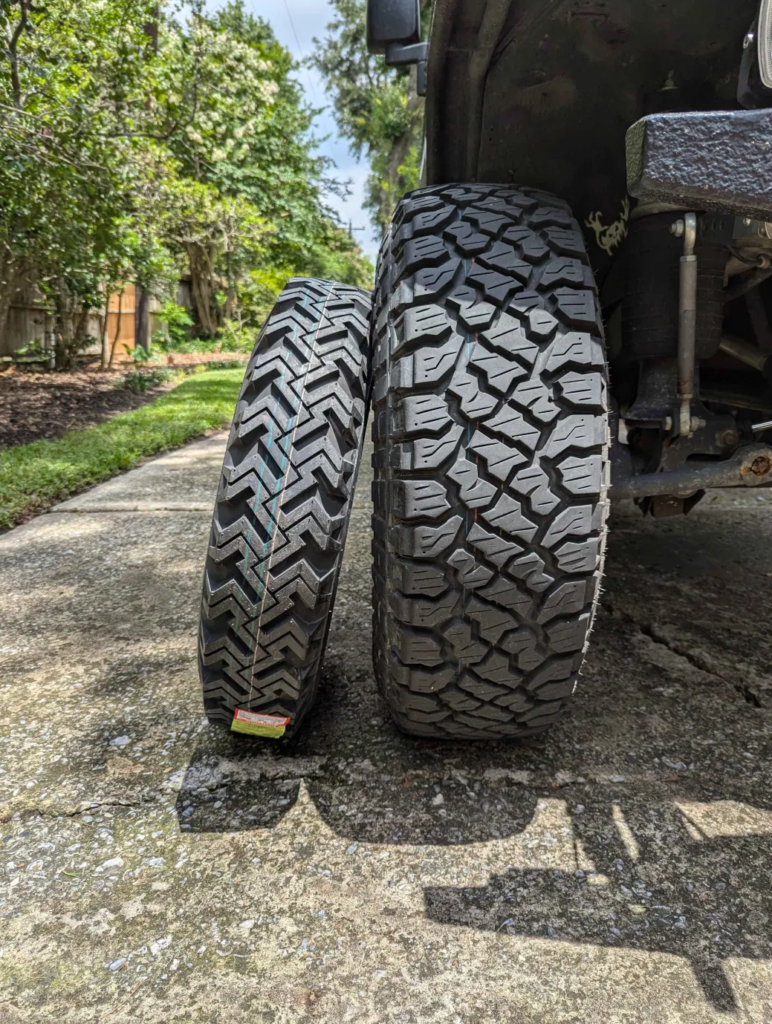
Here is how these 7.00-15 bias ply tires stack up next to my TJ Jeep’s 35″ x 10.5″ tires.

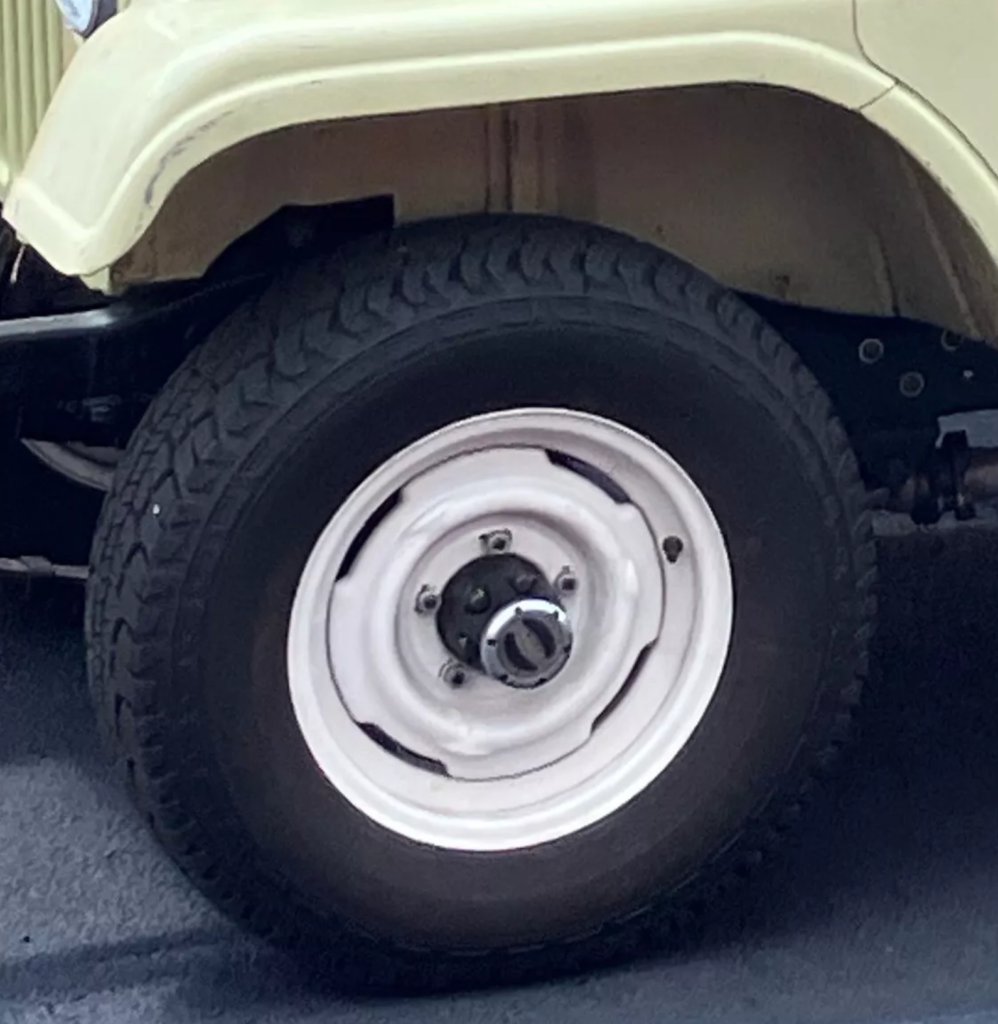
After mounting the tires and setting the pressure in the tires. 18psi in the front and 24psi in the rear.

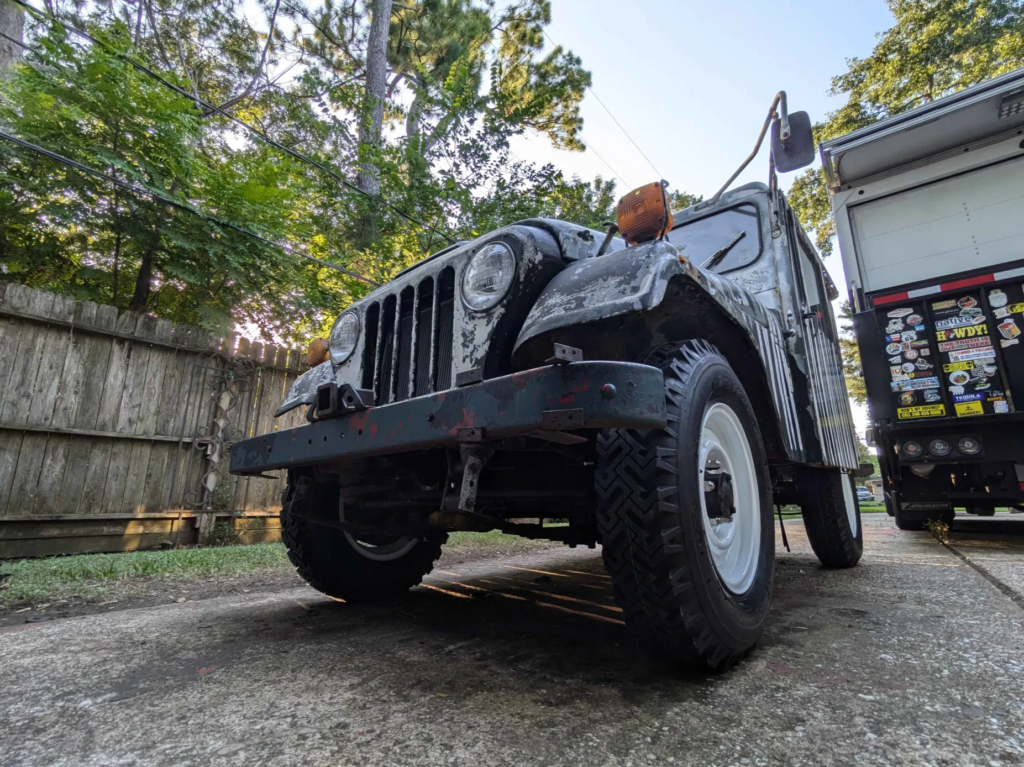
Tires and wheels look great on the DJ!
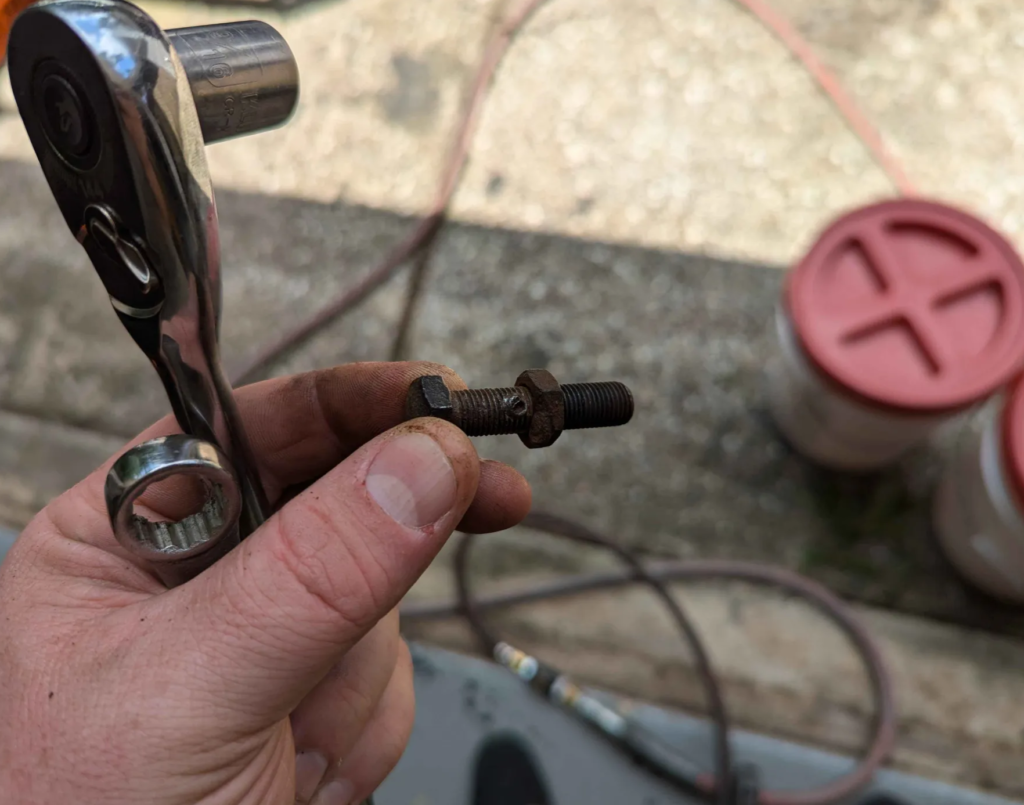
With the proper width of the tires, I adjusted the steering stops as far inwards as I could. Sometime in this Jeep’s previous life, someone welded the adjuster nut to the bolt so I could only adjust it so far. These are 3/8-24 fine thread bolts so next time I am at the hardware store I will pick up some so I can gain even more turning radius.
Fuel Tank Adventure
The previous owner of the DJ jeep mentioned that water kept getting into the fuel tank. This will be fun to get working. A flat blade screwdriver and a hammer tapping on the fuel sender locking ring and we can get a look inside.
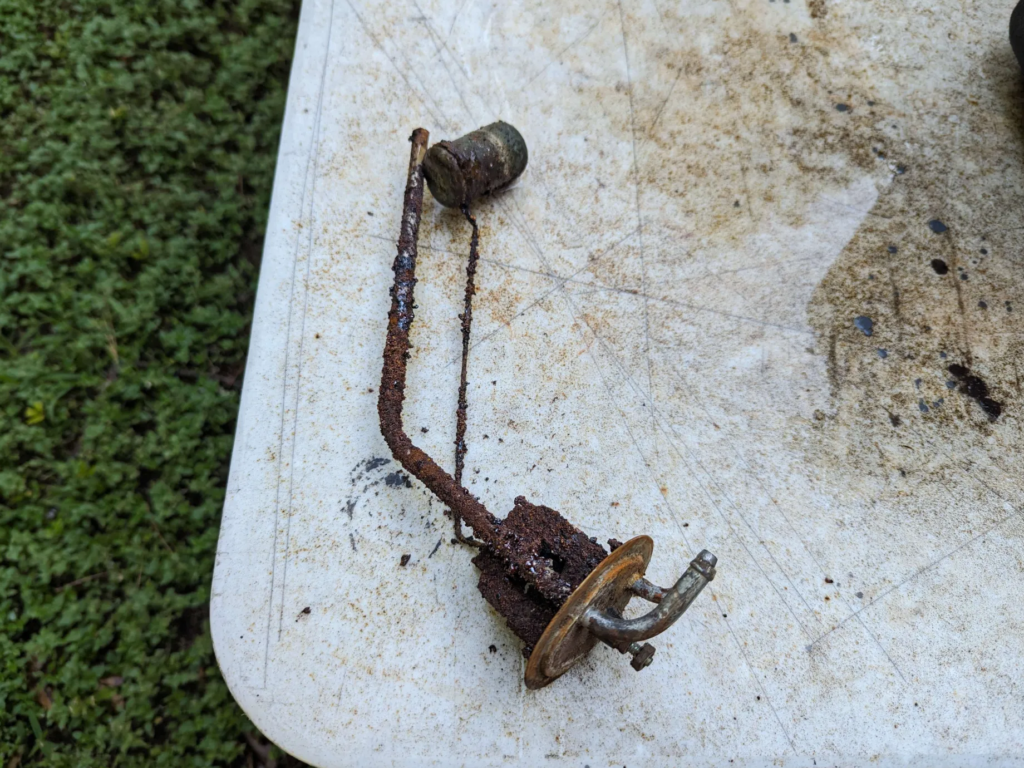
This fuel sender looks like it was on the Titanic.
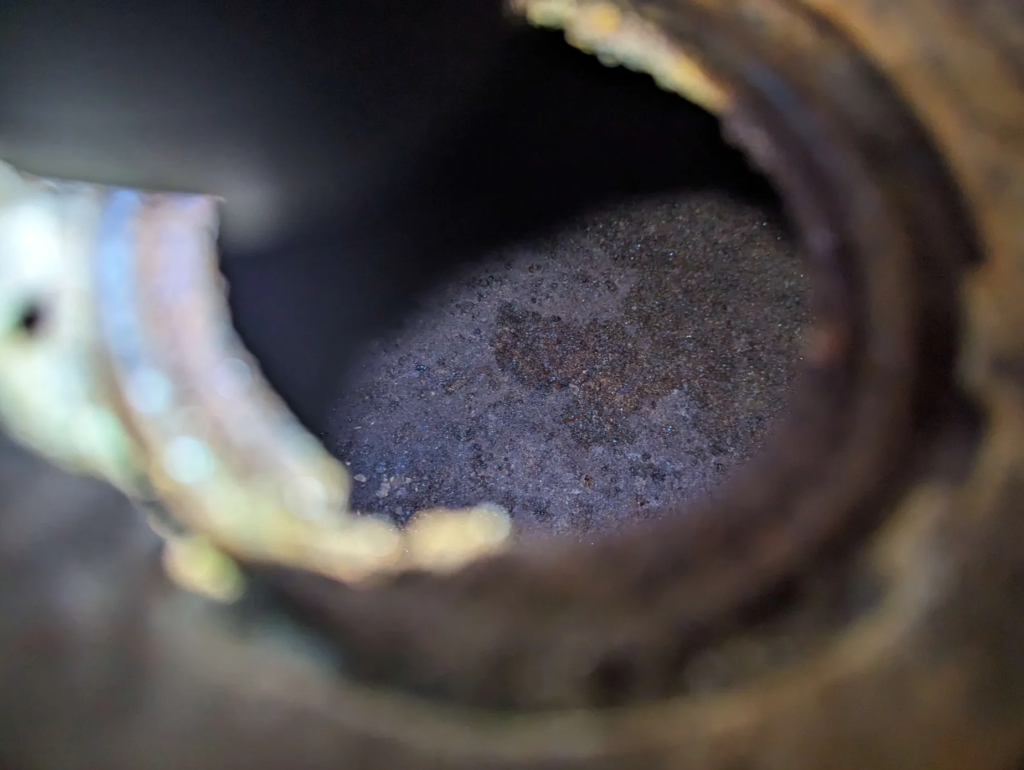
That is a lot of rust inside the tank :(
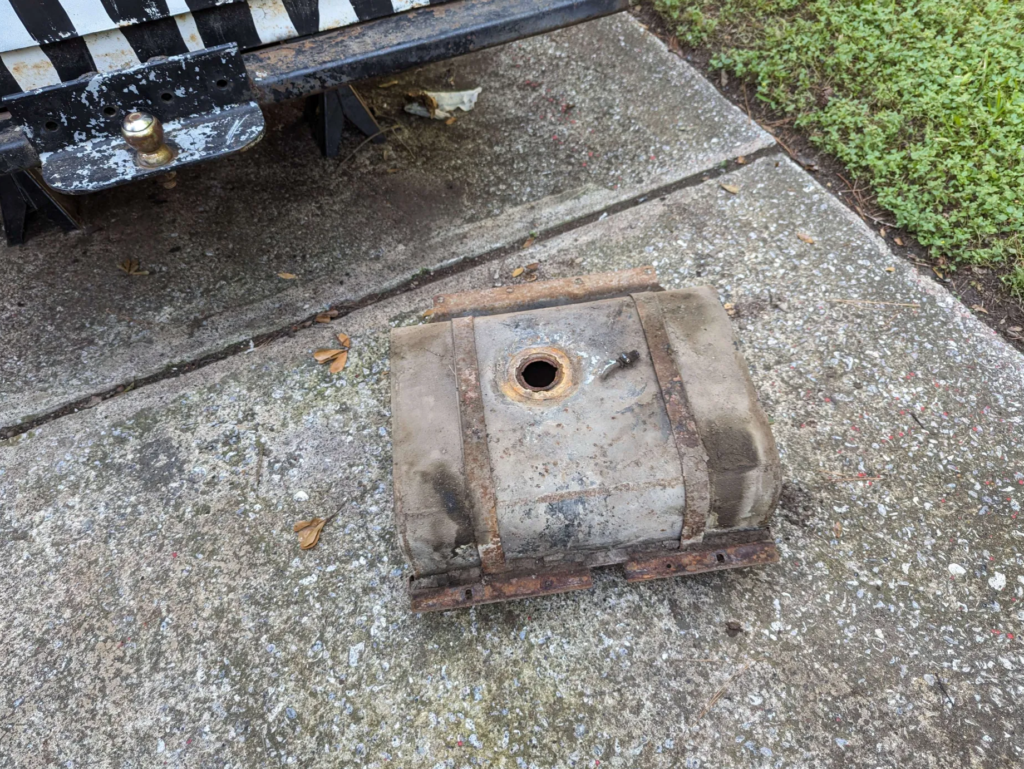
The tank dropped out with the removable of 6 bolts and tons of dirt and rust.
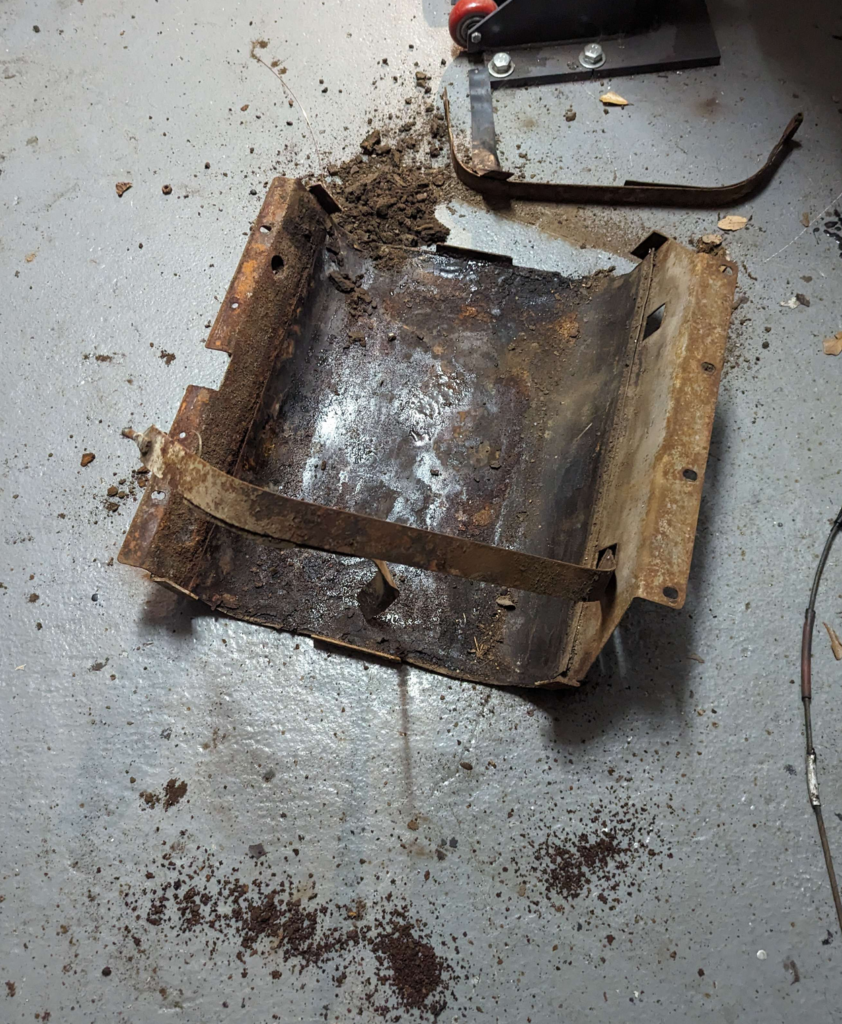
I took the fuel tank straps off and pulled the tank off the skid… The skid has traces of old gas and varnish on it… Not a good sign for the integrity of the tank.
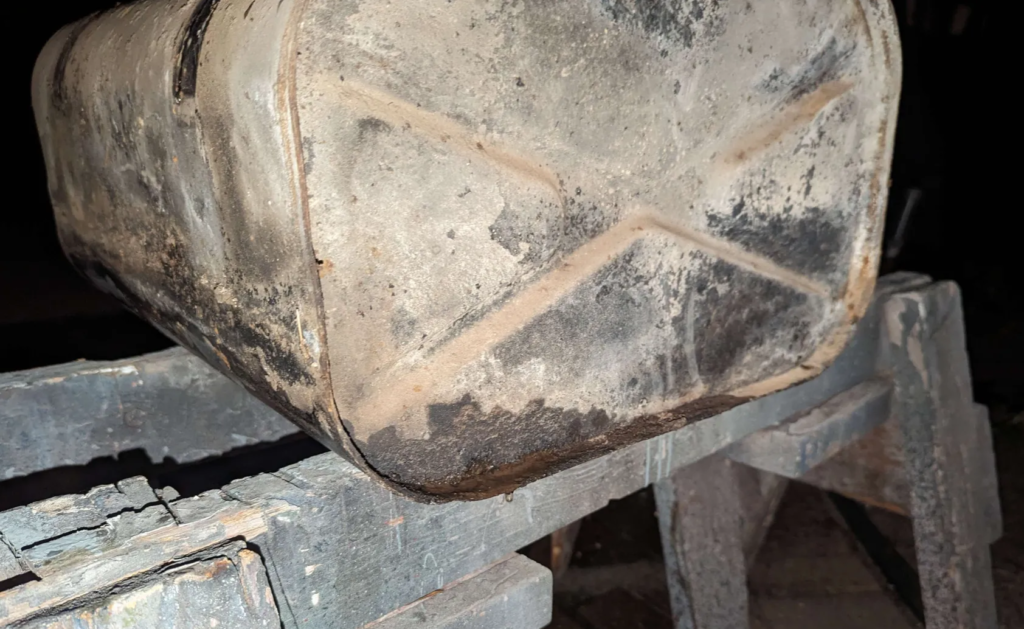
Filling the tank with water confirms my fears. The tank leaks.
I could try repairing the tank by removing all the rust and applying a liner but I think I am going to change to a CJ-5 Jeep Tank. Some searching online shows this won’t be a direct swap but it I should be able to make it work.
I ordered the following:
- MTS Company 0051 Fuel Tank
- Fits the 1978-1986 CJ Jeeps
- This is a plastic tank that fits CJ-5 and CJ-7 Jeeps
- Omix-Ada 17724.09 Fuel Pickup and Sender
- OE Reference: 5357373K
- Crown Automotive J5357023 Fuel Tank Skid
- My original skid does not fit the CJ-5/7 plastic tanks
- Spectra Premium ST60 Fuel Tank Straps
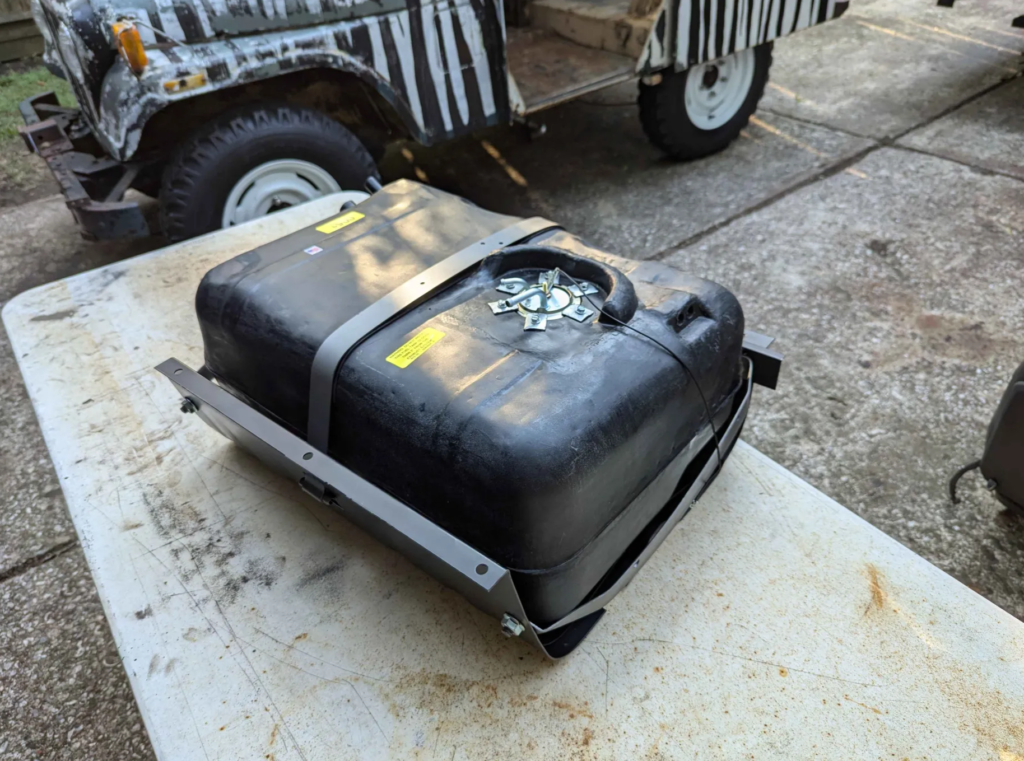
Tank assembled with the new sending unit, tank straps, and skid. I added some 1/16″ thick rubber between where the metal contacted the plastic tank.
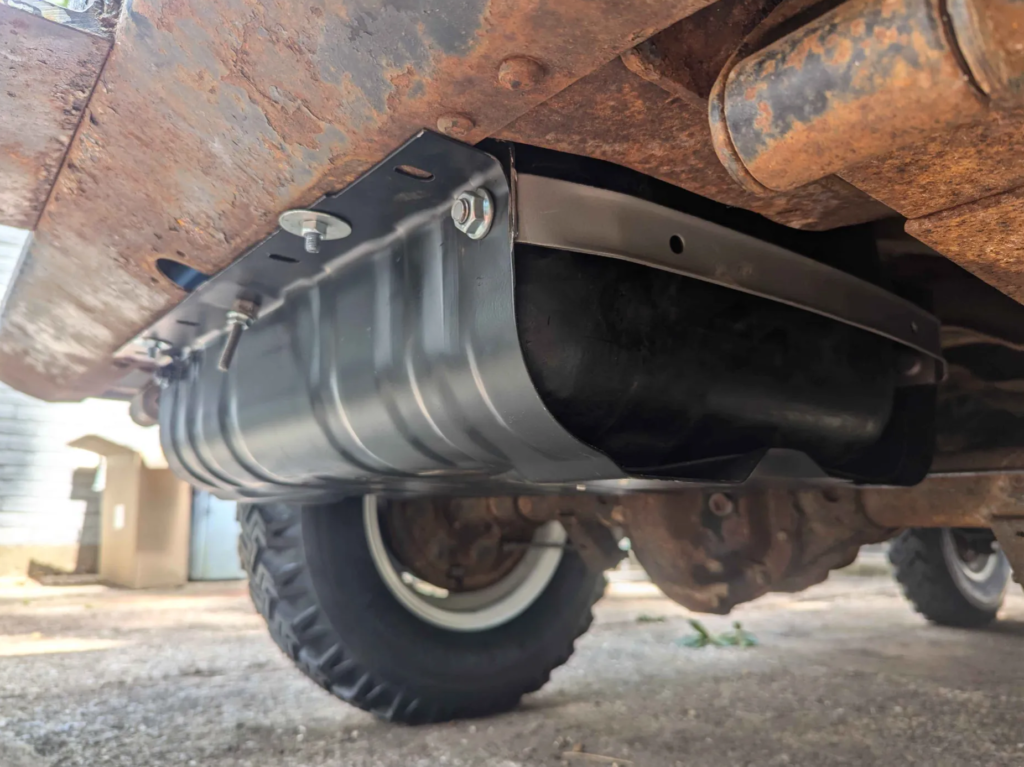
The skid needed some trimming and holes drilled to make it fit the DJ frame and cross members. The tank and straps did not need to be modified.
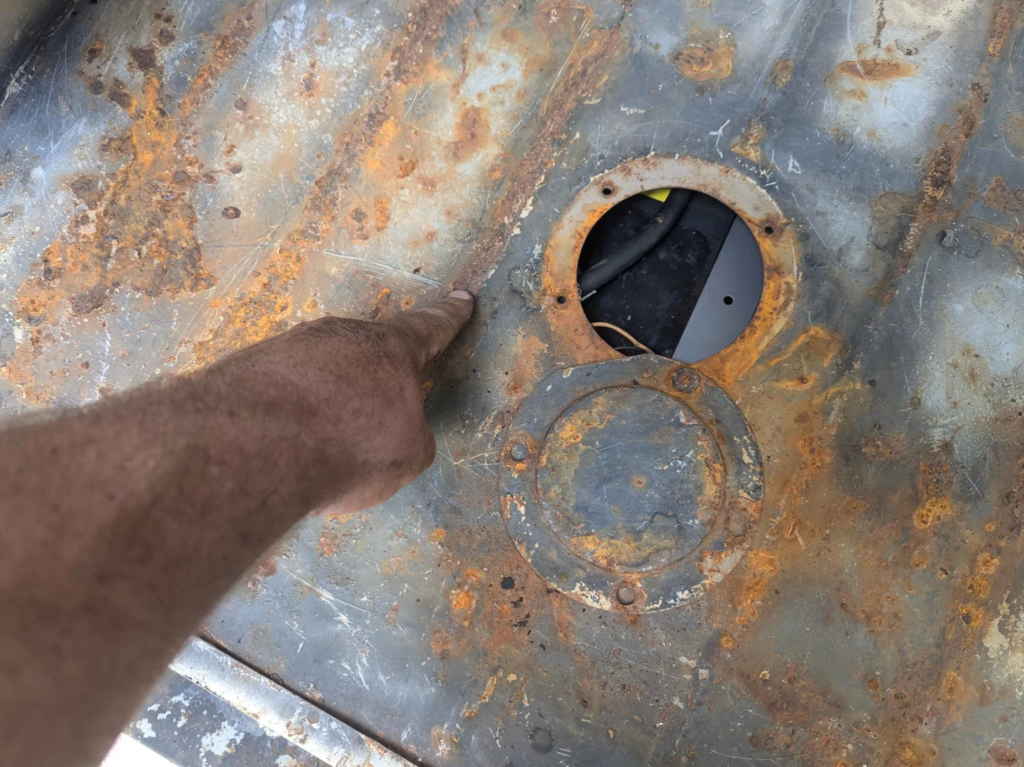
One of the problems with this tank is that it moves the sending unit. Not a problem for the wiring and fuel hoses but the access panel for the sender doesn’t line up anymore. Not a problem for a angle grinder though.
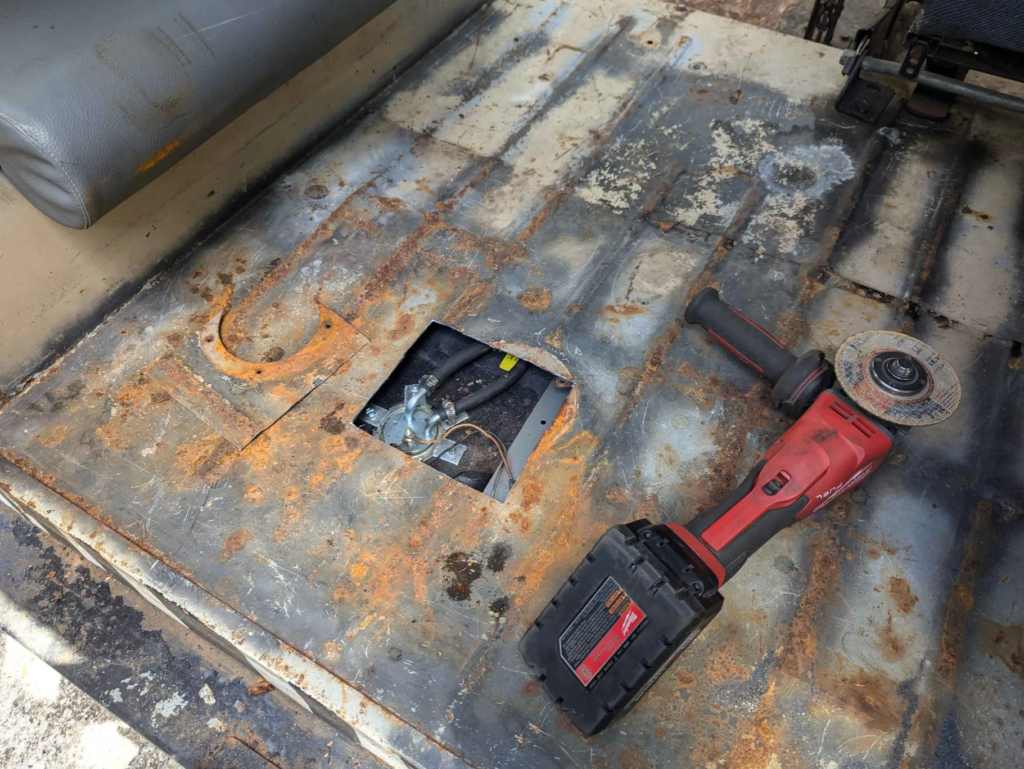
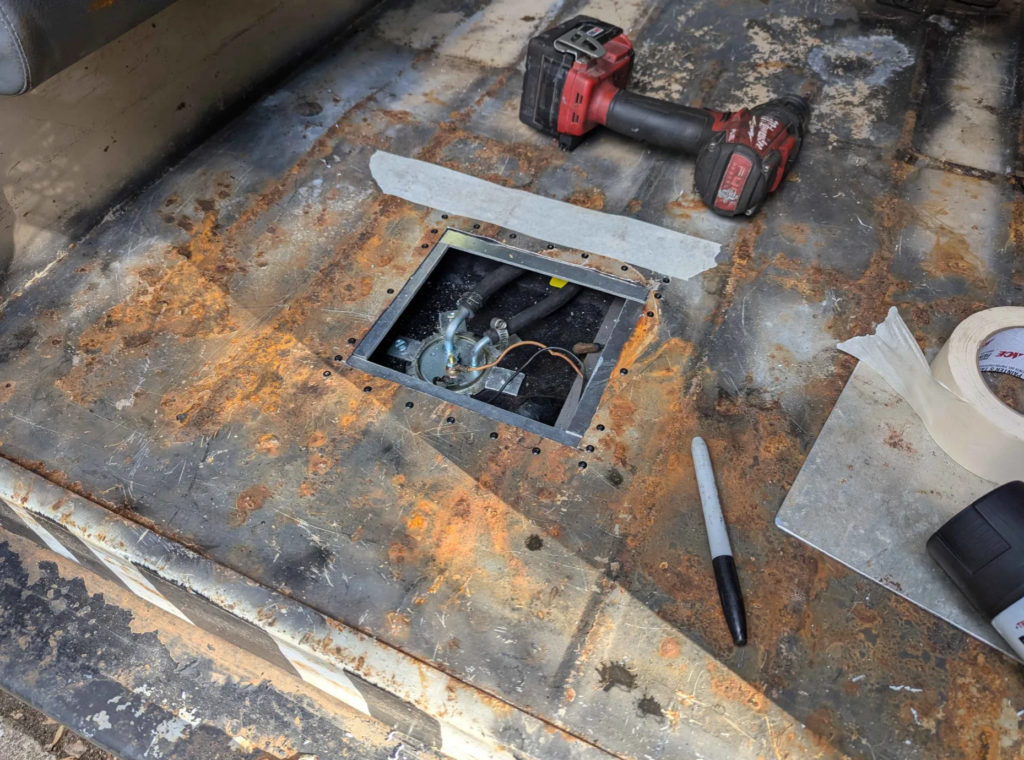
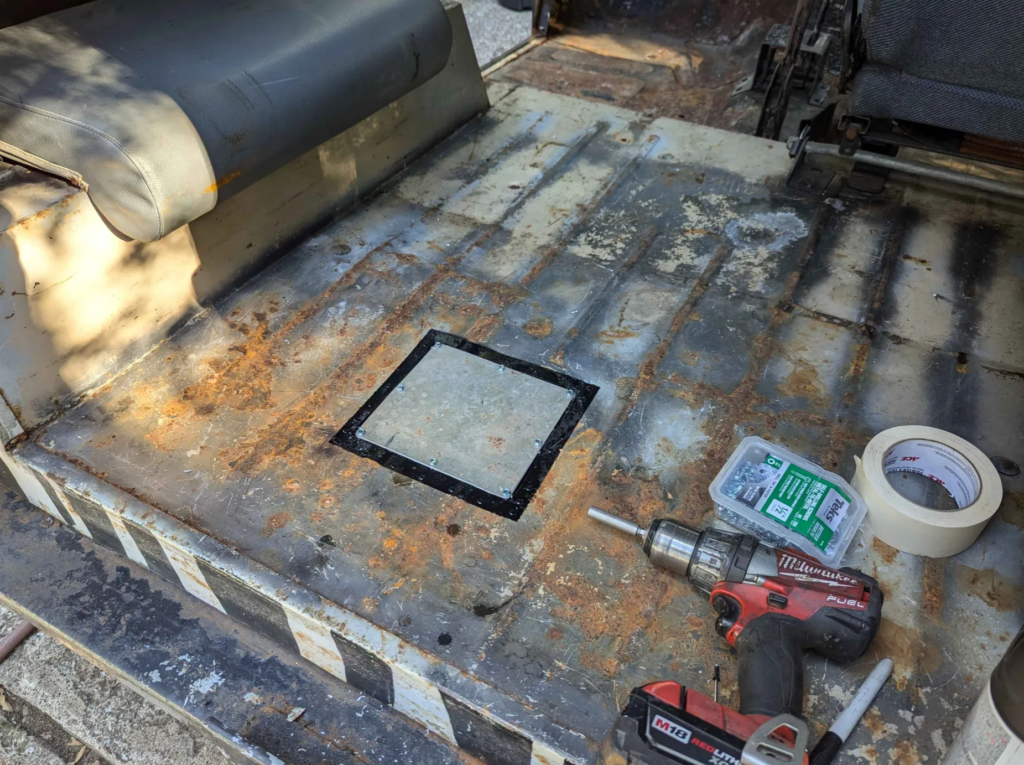
I cut the access panel large enough to access the new location of the sending unit and then riveted in some aluminum strips so I could screw down an aluminum plate to cover the hole.
Still need to see why the fuel gauge doesn’t work but the sender works and the tank hooks up to the stock filler hoses for this 1979 DJ.

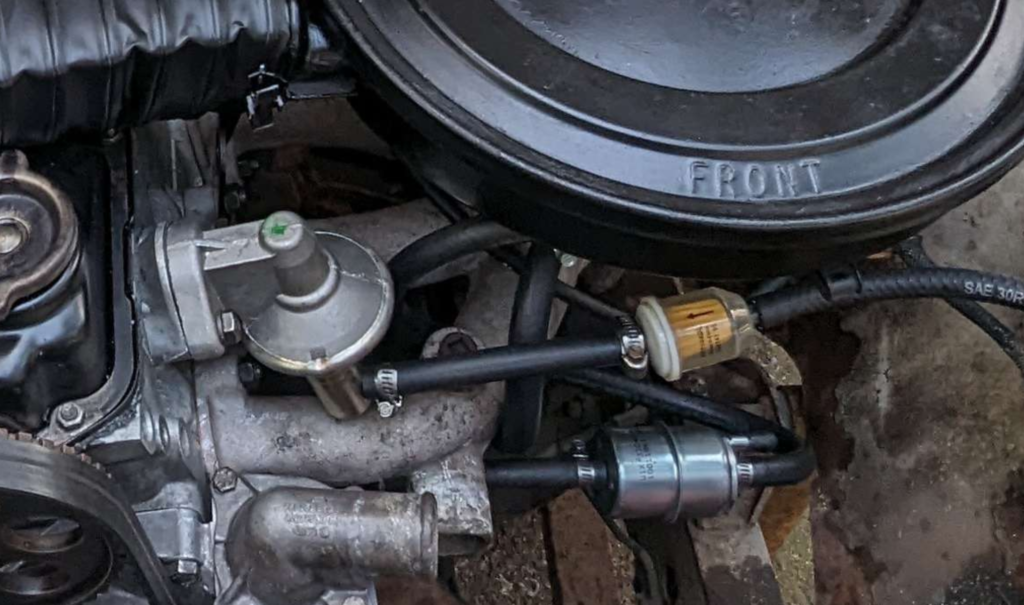
Here is how the fuel lines are routed up to the engine. The fuel comes from the tank in a 5/16″ line into a clear fuel filter. This goes into the intake side of the mechanical fuel pump. From the fuel pump it goes into another metal fuel filter. This fuel filter has a bypass line that has a restrictor inside. Bypass line is 1/4″ diameter and the smaller of the two barbs on the fuel filter. This goes back to the fuel tank. The other outlet of the fuel filter is 5/16″ and goes to the carburetor. The bypass line keeps fuel pressure down when the bowl float valve closes and allows the fuel pump to keep fuel moving in the lines to prevent vapor locking… in theory at least :)
Now lets see if the new fuel sender works with the old crusty fuel gauge.
With some fuel in the tank we are getting 36 ohms. So we might be good!

The gauge didn’t work but taking apart and cleaning the gauge cluster got it to work correctly.

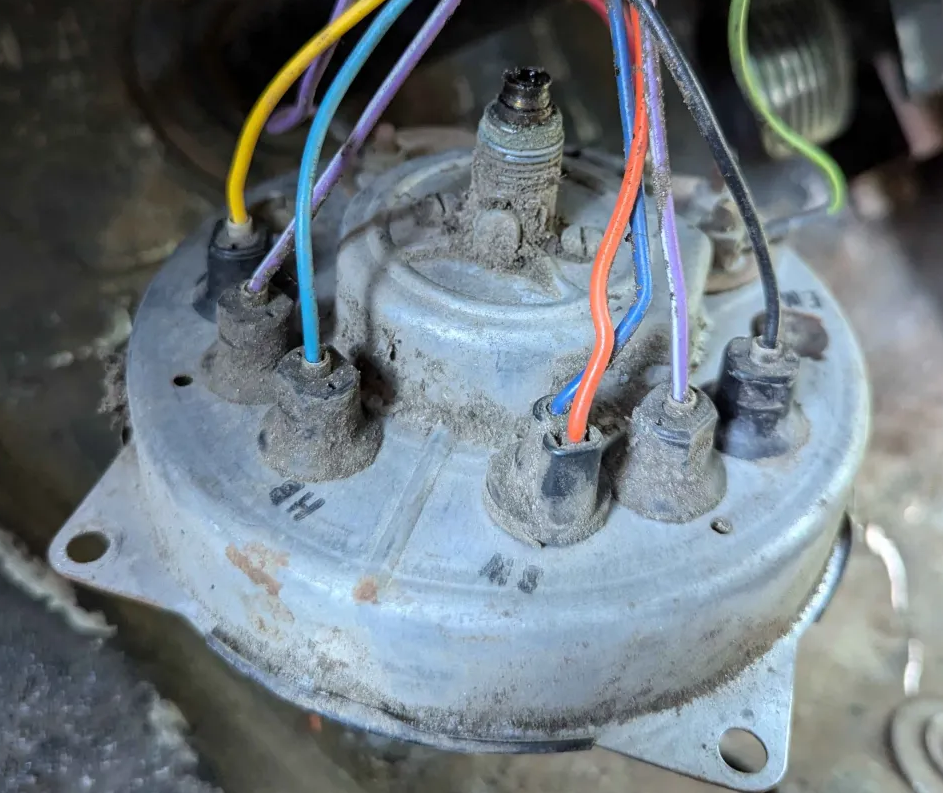
Contact cleaner and some adjustment and we have a working fuel gauge and tank!
Fixing The Headlights and Other Electrical
Almost all the electrical on the dash didn’t work besides the ignition switch. Over time stuff started to start working which lead me to believe that most of problems was due to connection and corrosion problems.
The Jeep came with a headlight switch so that was the first thing I replaced. This got the gauge lights and other interior lights working but the headlights didn’t work still. The wire from the headlight switch that goes to the headlights bulbs has 12V so the new headlight switch is working correctly.
Looking at the wiring diagram for the DJ Jeep, the power from the headlight switch goes to the hi/low beam switch on the floor. Poking at the hi/low beam switch with a multimeter showed that 12V was getting to the switch but not coming out. Time to see what is up.
Here is the switch, doing a continuity test shows that no current is passing through. Opening up the switch shows it looks ok.
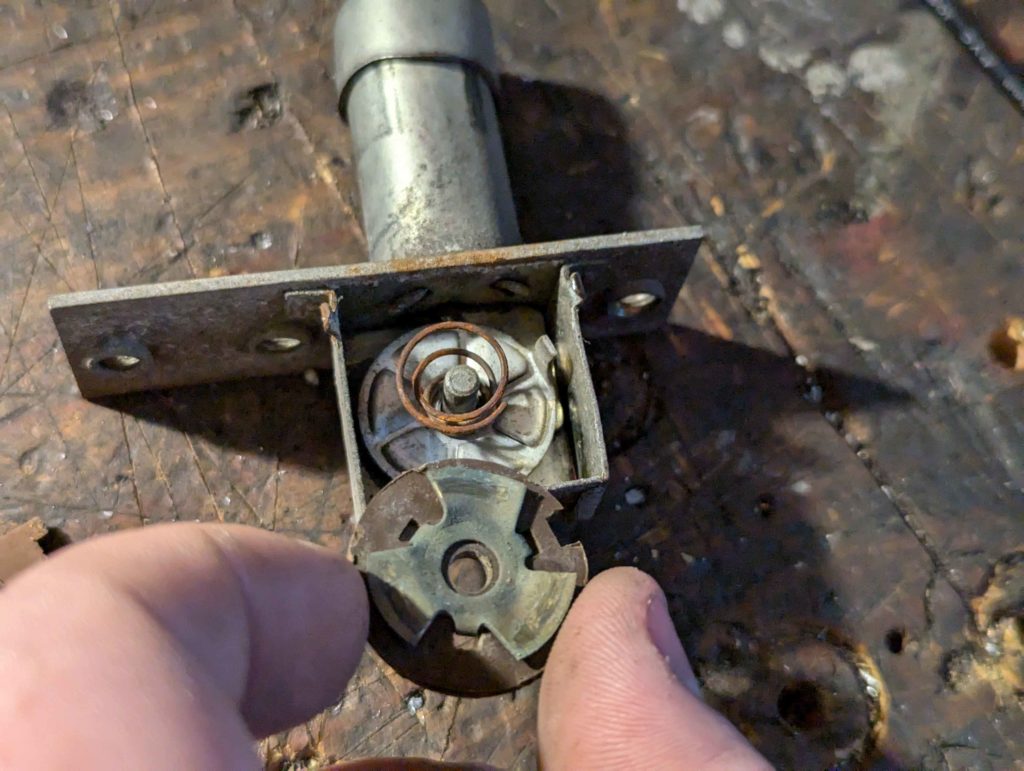
I cleaned the internal contacts with some contact cleaner anyways and reassembled. Switch still did not work. What I can figure, is that the pressed rivets that hold the contacts on have corrosion. I soldered the rivets together like this.
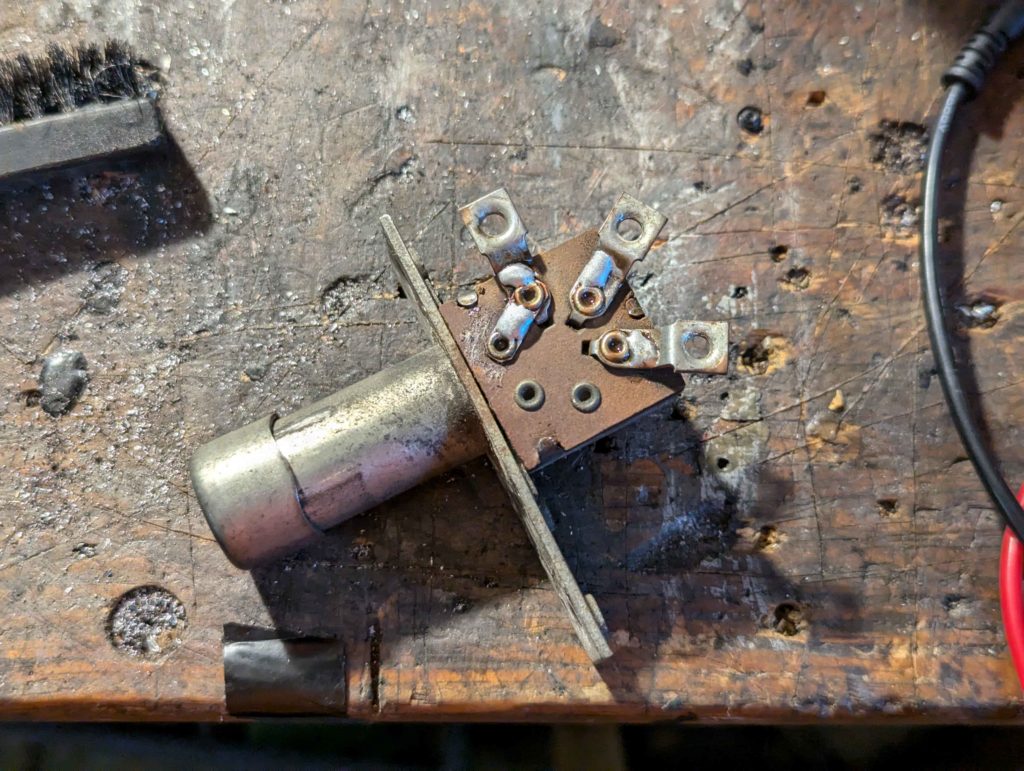
Which fixed the switch. This is the same switch used on the CJ jeeps so if this fails again I can just get a replacement.
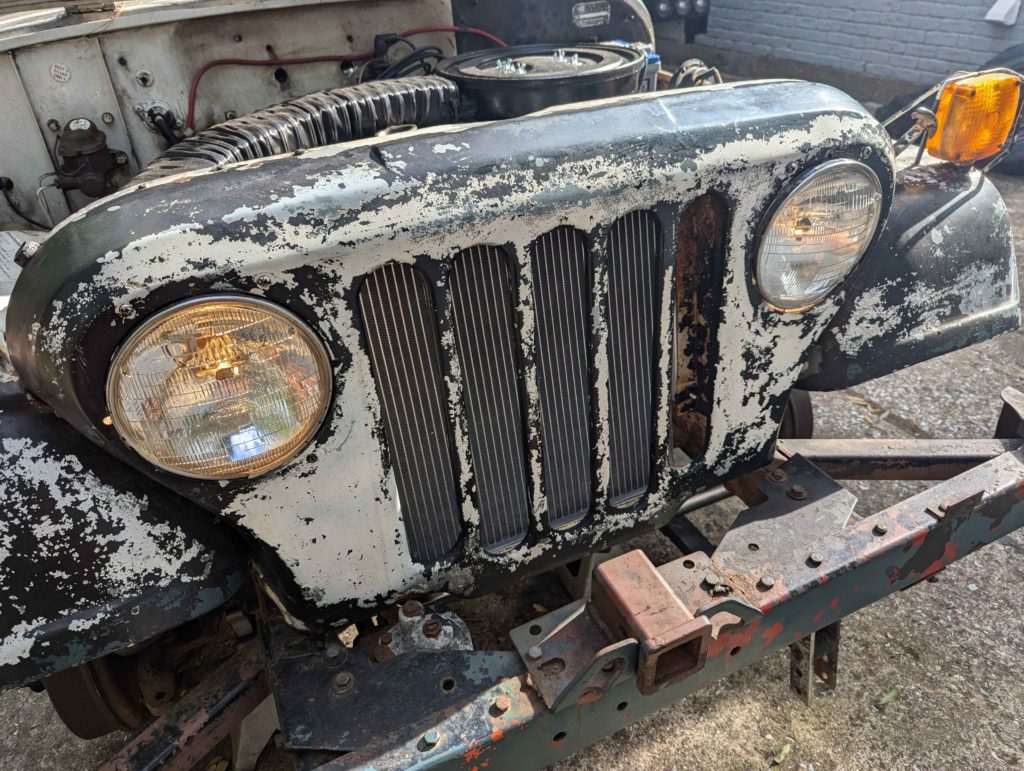
Headlights work! The gauges on the dash work but there is clearly a problem with the grounding or power to the gauges as they are not correctly reading. I will try replacing the ground strap from the engine to frame and add one from the frame to the dash like modern Jeeps have.